1. Theme Documentation
Thank you for purchasing our theme. We are happy that you are one of our customers and we assure you won't be disappointed as well. We do our best to produce top notch themes with great functionality, premium designs and human readable code. Before you get started we highly encourage you to get familiar with this documentation file. Spending half an hour reading the manual may save lot's of your time and avoid questions with obvious answers.
Please Notice : Our support covers getting setup, trouble using any features, and any bug fixes that may arise. Unfortunately we cannot provide support for customizations or 3rd party plugins. If you need help with customizations of your theme then you should enlist the help of a developer.
1.1. About the theme
Cleaning WordPress Theme is a premium theme for cleaning companies. If your company or your client's company offer cleaning services, our theme is the best solution to build a site. Our theme is flexible, you can change any color you want, upload any background you want, select any fonts you want (600+ google fonts). The theme is simple to use, just install it and fill all fields with your content. That's all.
Although every effort has been made to ensure the theme is bug free and easy to use there is always a chance errors may occur. If you do find a problem please notify us immediately through our Help Center so we can ensure it gets fixed as quickly as possible.
Need Help ?
Please do not hesitate to get in touch with us if you need help. We also welcome your feedback and suggestions. Please contact us through our help center and we are happy to help.
We usually respond to all queries within 24 hours during weekdays. We are mostly not available during weekends and public holidays. We live across different timezones and have different people for answering different queries. So if we find us online responding to other comments and not yours please be patient with us.
Thank you,
Design Themes Support
1.2 Help Videos
1.3 WordPress Information
To use this theme you must have Wordpress engine installed. We assume you have a working version of WordPress already up and running. If not you can check this great video by Woothemes guiding you through the process of Wordpress installation.
We also encourage you to actively use the links below. These useful resources cover most of general WordPress questions you may have:
- Wordpress FAQ - Information and resources about WordPress including history, features, semantics, glossary, and information to help you determine whether or not WordPress is the blogging tool for you.
- Wordpress Lessons - Great source of knowledge for WordPress beginners
- PHP Function References - Detailed information on WordPress PHP functions and usage examples
1.4 Theme Requirements
We have tested our theme in most standard hosting setups. Anyhow make sure your hosting server matches the following requirements.
- Latest version of WordPress installed
- PHP5 or higher and MySQL 5 or higher
- We recommend to enable 'mod_rewrite' module (If not enabled sometimes pages or posts will result in bad gateway error)
- Memory limit (memory_limit) should be atleast 128MB
- Maxium File Upload size (upload_max_filesize) should be atleast 32MB
1.5. What's Included
When you purchase our theme from ThemeForest, you need to download the Veda files from your ThemeForest account. Navigate to your downloads tab on ThemeForest and find We Clean . Click the download button to see the two options. The Main Files contain everything, the Install-able WordPress Theme is just the installable WordPress theme file. Below is a full list of everything that is included when you download the main files, along with a brief description of each item.
- We Clean Theme Folder : weclean.zip
- We Clean Child Theme Folder : We Clean -Child-Theme.zip
- We Clean Demo Slider Folder – This contains all the Layer Slider & Revolution Slider
- Documentation Folder – Contains the developer documentation.
1.6. We Clean Theme Support
All of our items come with 6 months of included support and free lifetime updates for your theme. Once the 6 months of included support is up, you have the opportunity to extend support coverage up to 6 or 12 months further. If you choose to not extend your support, you will still be able to submit bug reports via email or item comments and still have access to our online documentation knowledge base and video tutorials.
Envato clarifies item support here http://themeforest.net/page/item_support_policy
We have an advanced, secure ticket system to handle your requests. Support is limited to questions regarding the theme's features or problems with the theme. We are not able to provide support for code customizations or third-party plugins. If you need help with anything other than minor customizations of your theme, we suggest enlisting the help of a developer.
How To Start Receiving Support
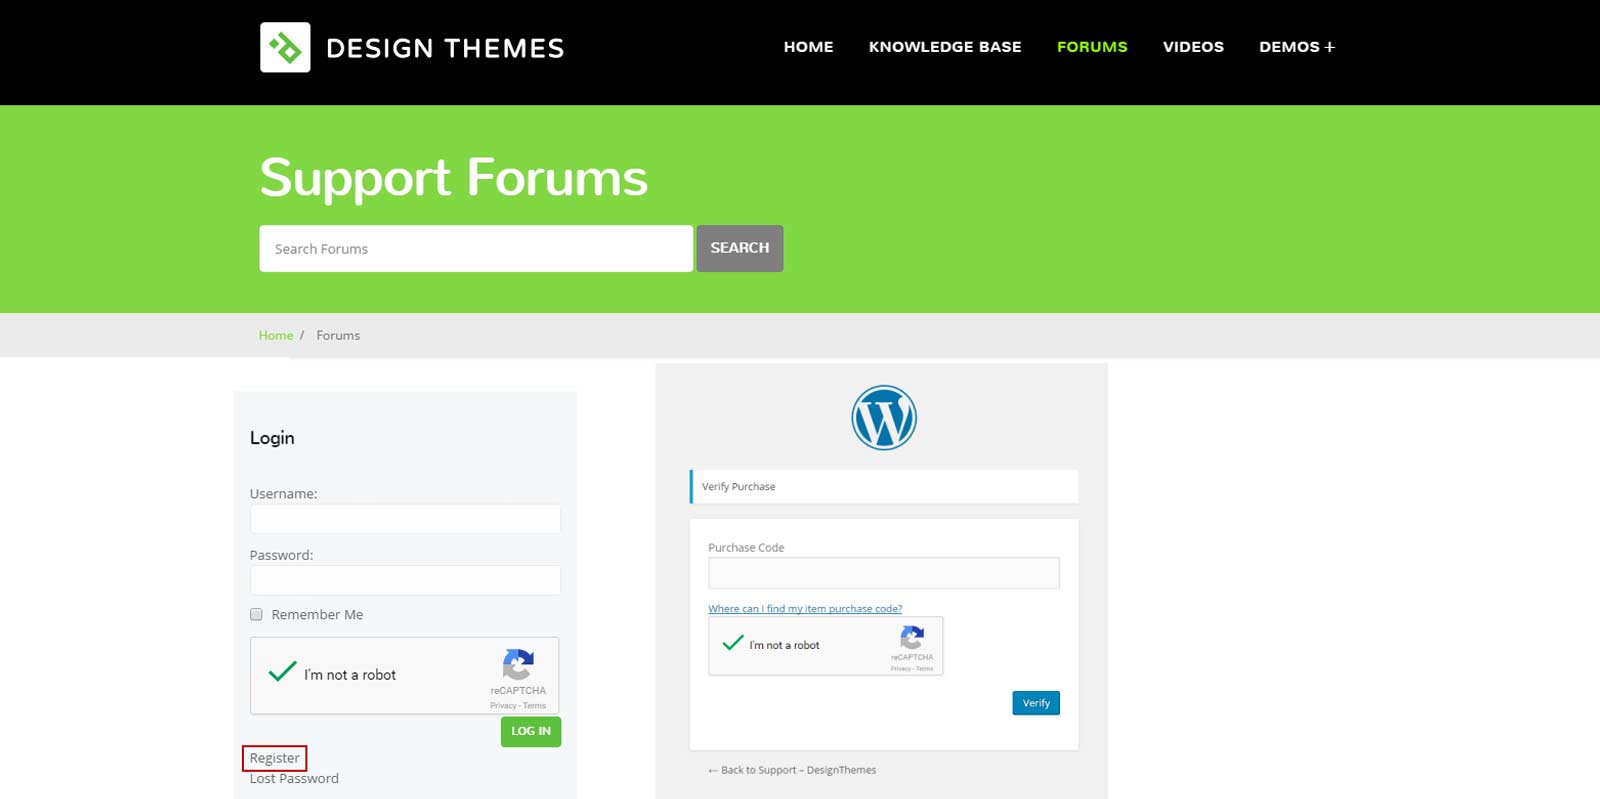
Step 1 – Click Here To Create An Account, you will need your ThemeForest Purchase Code which can only be received after buying the theme from Themeforest.net.
Step 2 – Once you are signed up, you need to sign into our support center with your new account.
Step 3 – To create a new ticket, visit this page
How To Download Your Purchase Code From ThemeForest
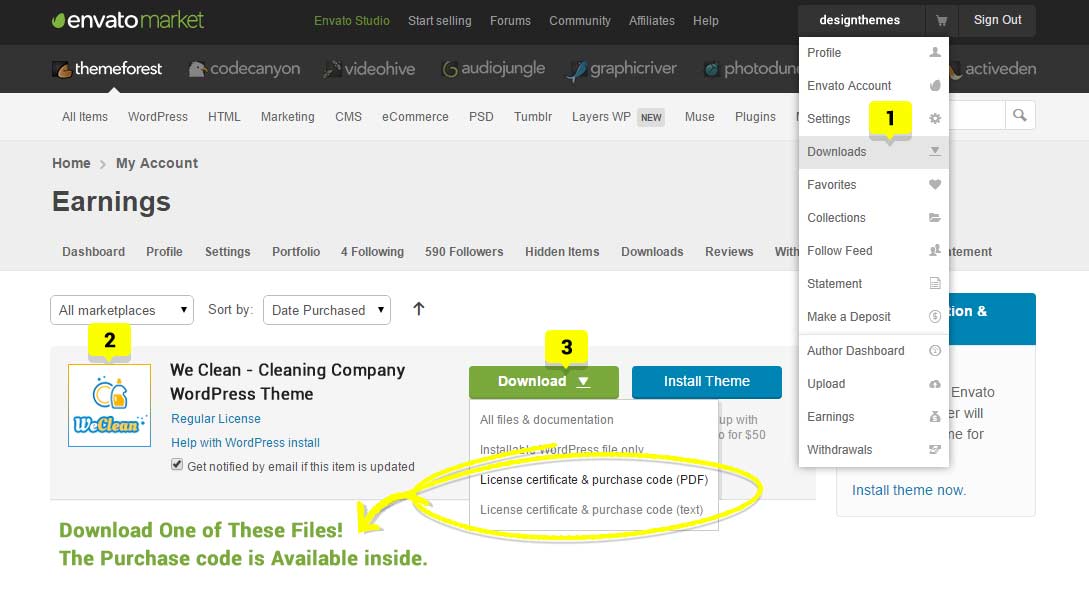
Step 1 : Log into your ThemeForest account and click your username in the top right corner to access the dropdown. Select the “Downloads” link.
Step 2 : Find the Foreal Purchase in the list of items you have bought.
Step 3 : Click the “Download” button to activate the dropdown menu. Select to download the license certificate and purchase code as a PDF or Text file. Open the file to find the purchase code.
Example Purchase Code: xxxx12-YYY145-4q70-a109-C458fdtws
1.6.1. How to Extend/Renew your Support Period?
You are eligible to renew or extend your support subscription if you have less than 6 months support remaining and the author is still supporting the item. The cost of purchasing support can vary according to the different periods of your subscription. For example, extending your support subscription while it’s still active costs less than renewing it when it has expired. To learn more about this, please read Envato’s‘Extending and Renewing Item Support’ article found here.
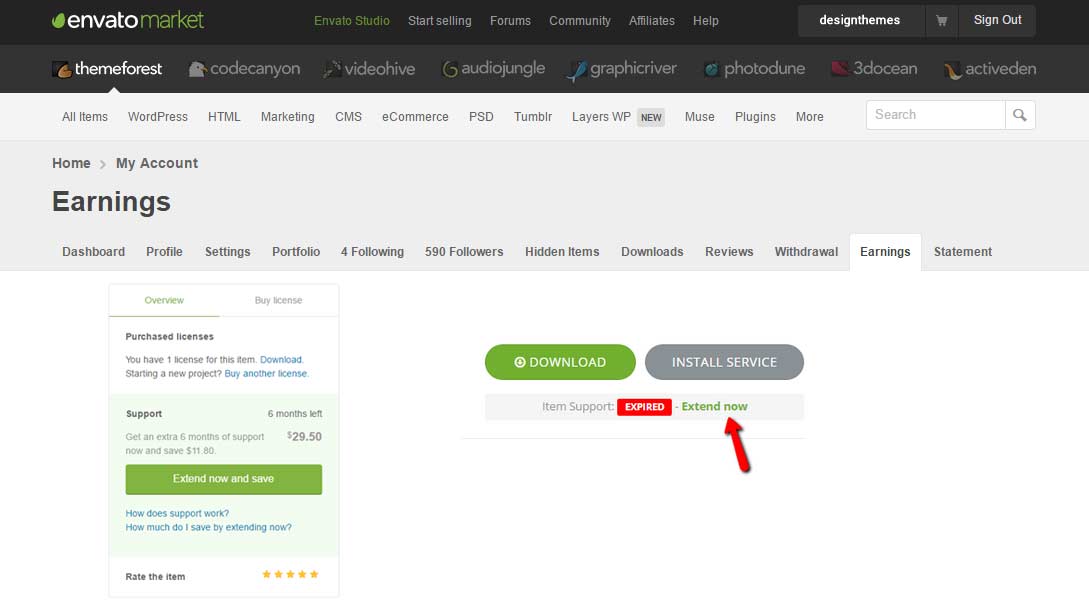
Step 1 – Login to your ThemeForest account and go to the Downloads tab.
Step 2 – Locate your We Clean purchase. On there, you’ll see how many months of support you have remaining, and beside it there’s an ‘Extend Now’ link.
Step 3 – Click the ‘Extend Now’ link, and it will redirect you to the We Clean Theme ’s item page.
strong>Step 4 – On the right hand side, click the ‘Extend Now and Save’ button.
Step 5 – Once you click the ‘Extend Now and Save’ button, you’ll be redirected to the checkout page. Confirm your payment details and follow the on screen prompts to finish purchasing the extension. How to Extend/Renew your Support Period
Resources:
- Envato: Item Support Policy
- Envato Help: Extending and Renewing Item Support
1.7 Theme Installation
1. At first, after purchasing this theme, please download the package from Themeforest. All you need to do that is move your mouse over your login name in the right top corner (of course after you`re logged in Themeforest) and then click Download. Here you will find all the items that you have purchased.
2. In the next step click the Download > Main File(s) button next to designthemes theme and save the package on your computer.
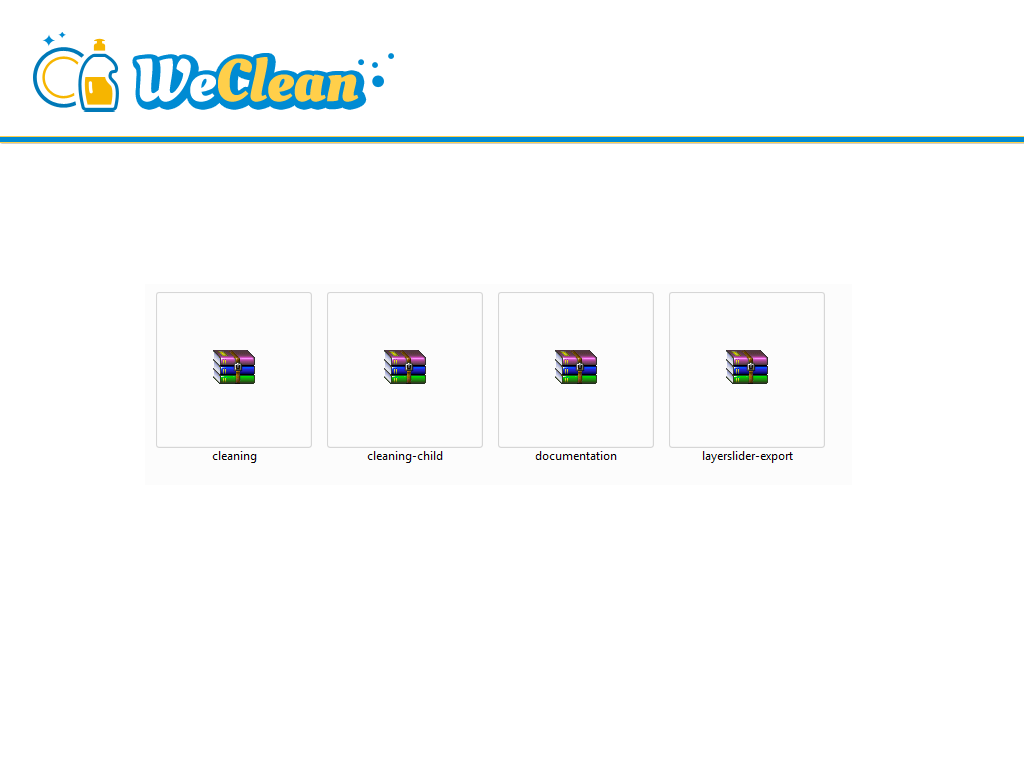
3. Please unpack the whole package after downloading it from Themeforest. In that package, you can find things like documentation.zip, weclean.zip, We Clean -child.zip, and revolutionslider-export.zip files.
Note : If you try to install the wrong files you will get missing styles.css file error. This is the most common error meaning you are trying to install incorrect package.
Update WordPress : To ensure a positive user experience, we highly recommend you to update your WordPress to the latest stable version 4.0 or higher. This will help to ensure that you are able to utilize all of the latest features of WordPress.
1.7.1. Theme Installation via WordPress
Follow the steps below to install the theme via WordPress.
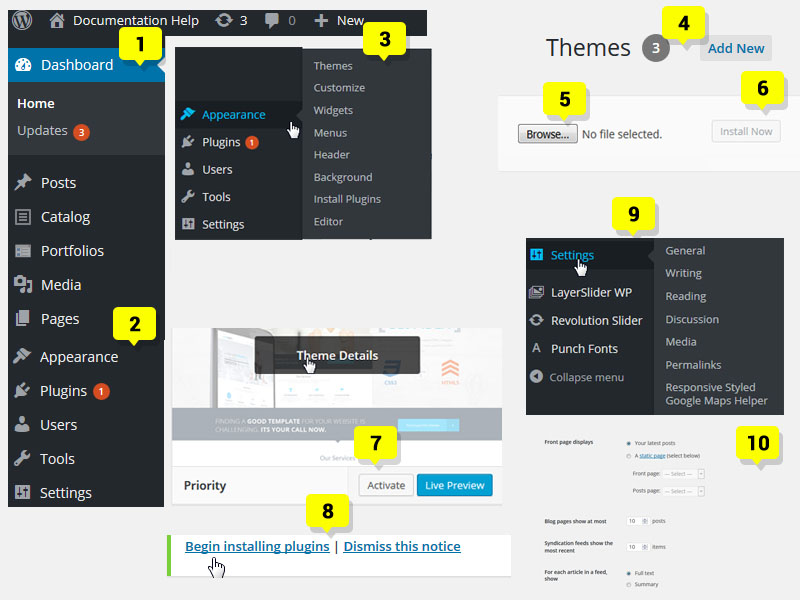
Step 1 – Login to admin panel.
Step 2 – Go to Appearance - Themes and click on the Add New button.
Step 3 – Choose Upload theme option. Click on Browse...(Choose file in Safari/Chrome), select the "weclean.zip" and click InstallNow button.
Step 4 – After successfully installation click on Activate or go to Appearance - Themes and click on Activate to activate the newly installed theme.
Step 5 – After the theme's activation you will be prompted to install recommended plugins: DesignThemes Core Features Plugin, Revolution Slider, Events Calendar, Visual Composer and WooCommerce
Step 6 – Once required plugins are activated, navigate to Settings > Permalinks, select 'Post name' in 'Common Settings' tab and save it.
1.7.2. Theme Installation via FTP
Follow the steps below to install via FTP.
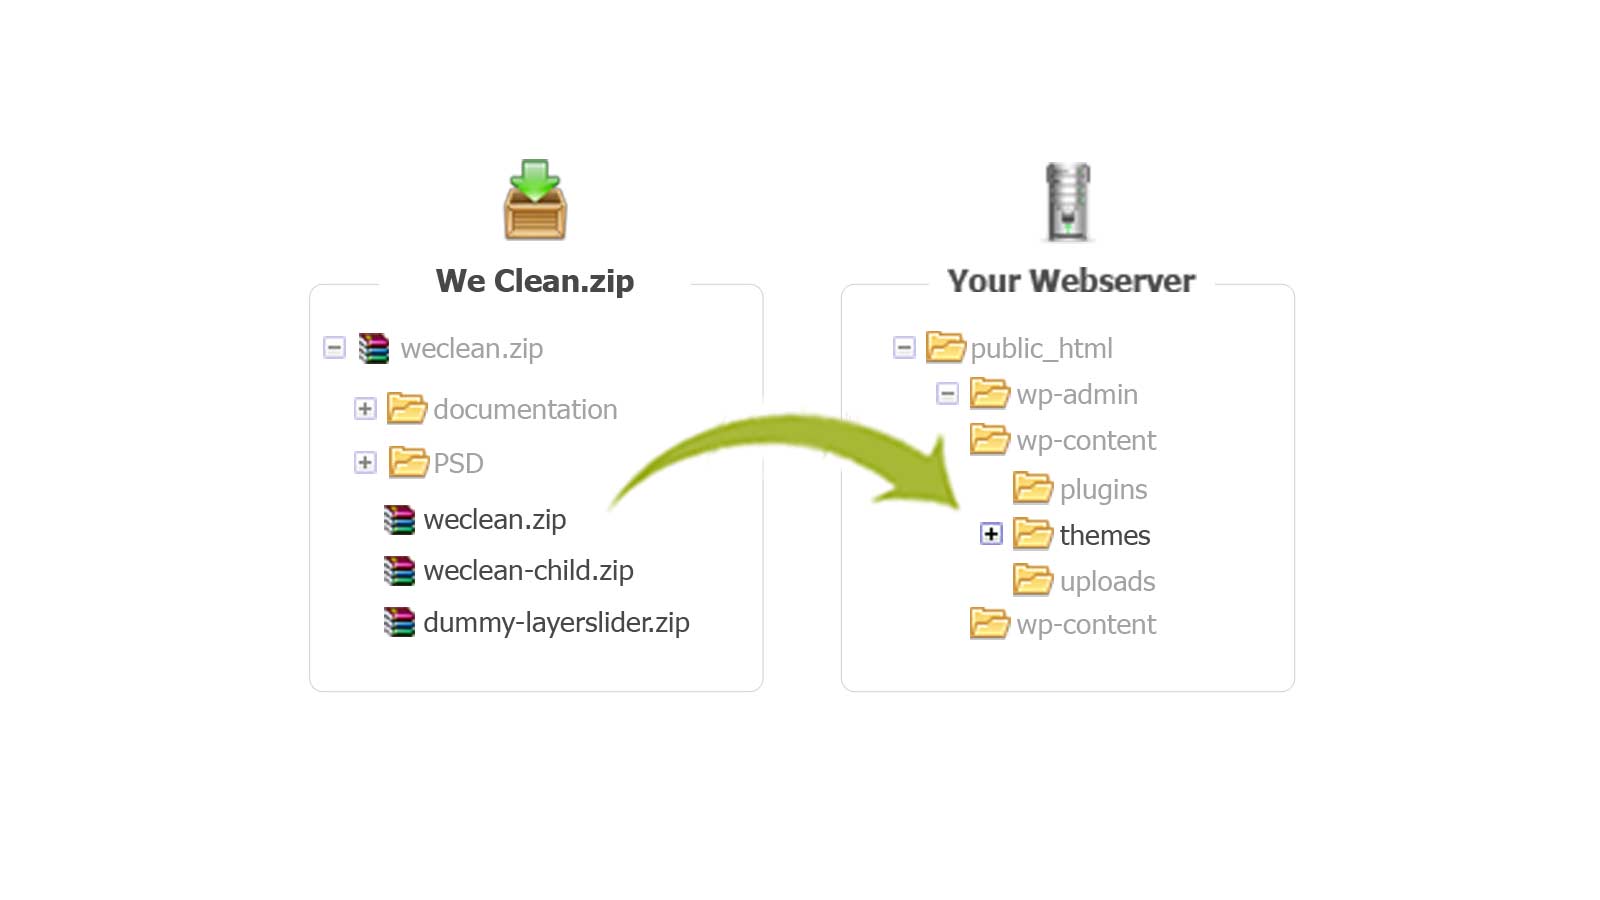
- Log into your hosting server space using FTP software.
- Unzip the "weclean.zip" ( "weclean.zip" will be found inside "weclean.zip" ) file and ONLY use the extracted 'We Clean ' theme folder.
- Upload the extracted 'We Clean ' theme folder into wp-content / themes folder.
- Activate the newly installed theme in Appearance > Themes.
- Then you will see a notification message to install and activate the required & recommended plugins. 'DesignThemes Core Features Plugin' should be installed and activated immediately as the prompted features will be loaded only if this plugin is activated.
- Once required plugins are activated, navigate to Settings > Permalinks, select 'Post name' in 'Common Settings' tab and save it.
Please take a look at structure of the weclean.zip archive you got after purchasing.
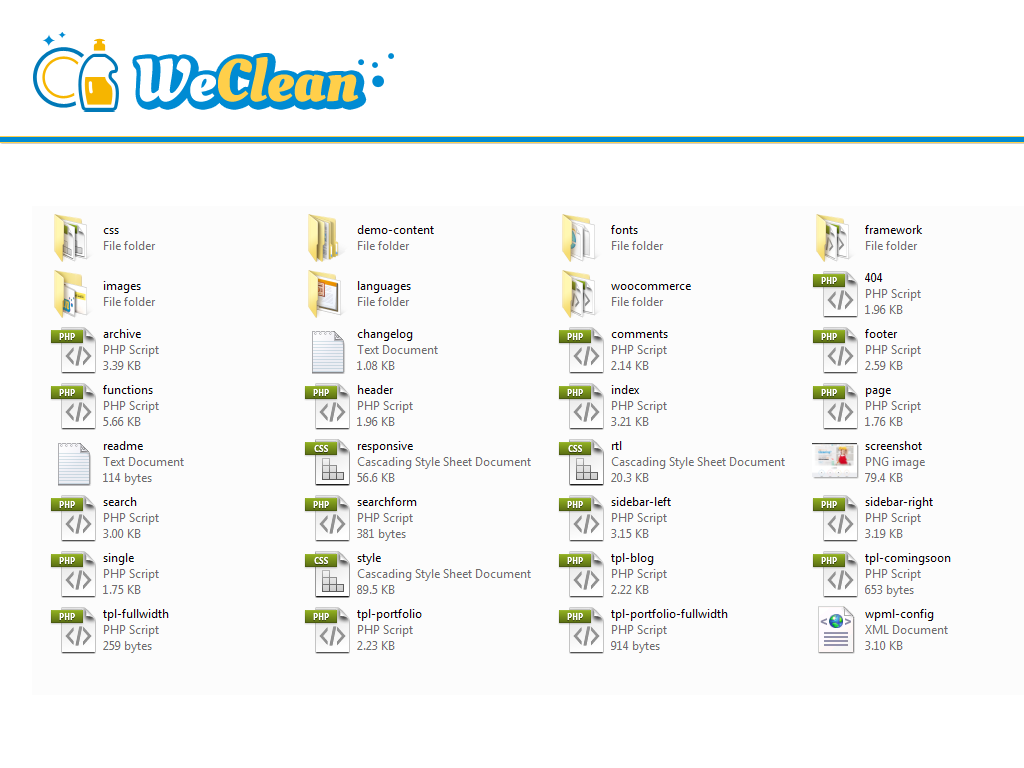
1.8 Folder Structure
- style.css - main style.css
- responsive.css - makes the template as responsive
- rtl.css - supports right to left alignment of some languages
- The css folder - contains the css for all major browsers, prettyphoto & for the font awesome. - ( Please ensure that your new styles are applied, make sure that they carry enough "weight" and that there isn't a style lower in the CSS file that is being applied after yours. )
- The css / skins folder - contains the css for predefined skins that comes with the template.
- The framework folder - contains all theme related files and javascript files.
- The images folder - contains all the images that are used in the stylesheets for the layout purpose.
- The languages folder - contains default .po files.
- The woocommerce folder - contains customized files of woocommerce.
1.9 Plugin Installation
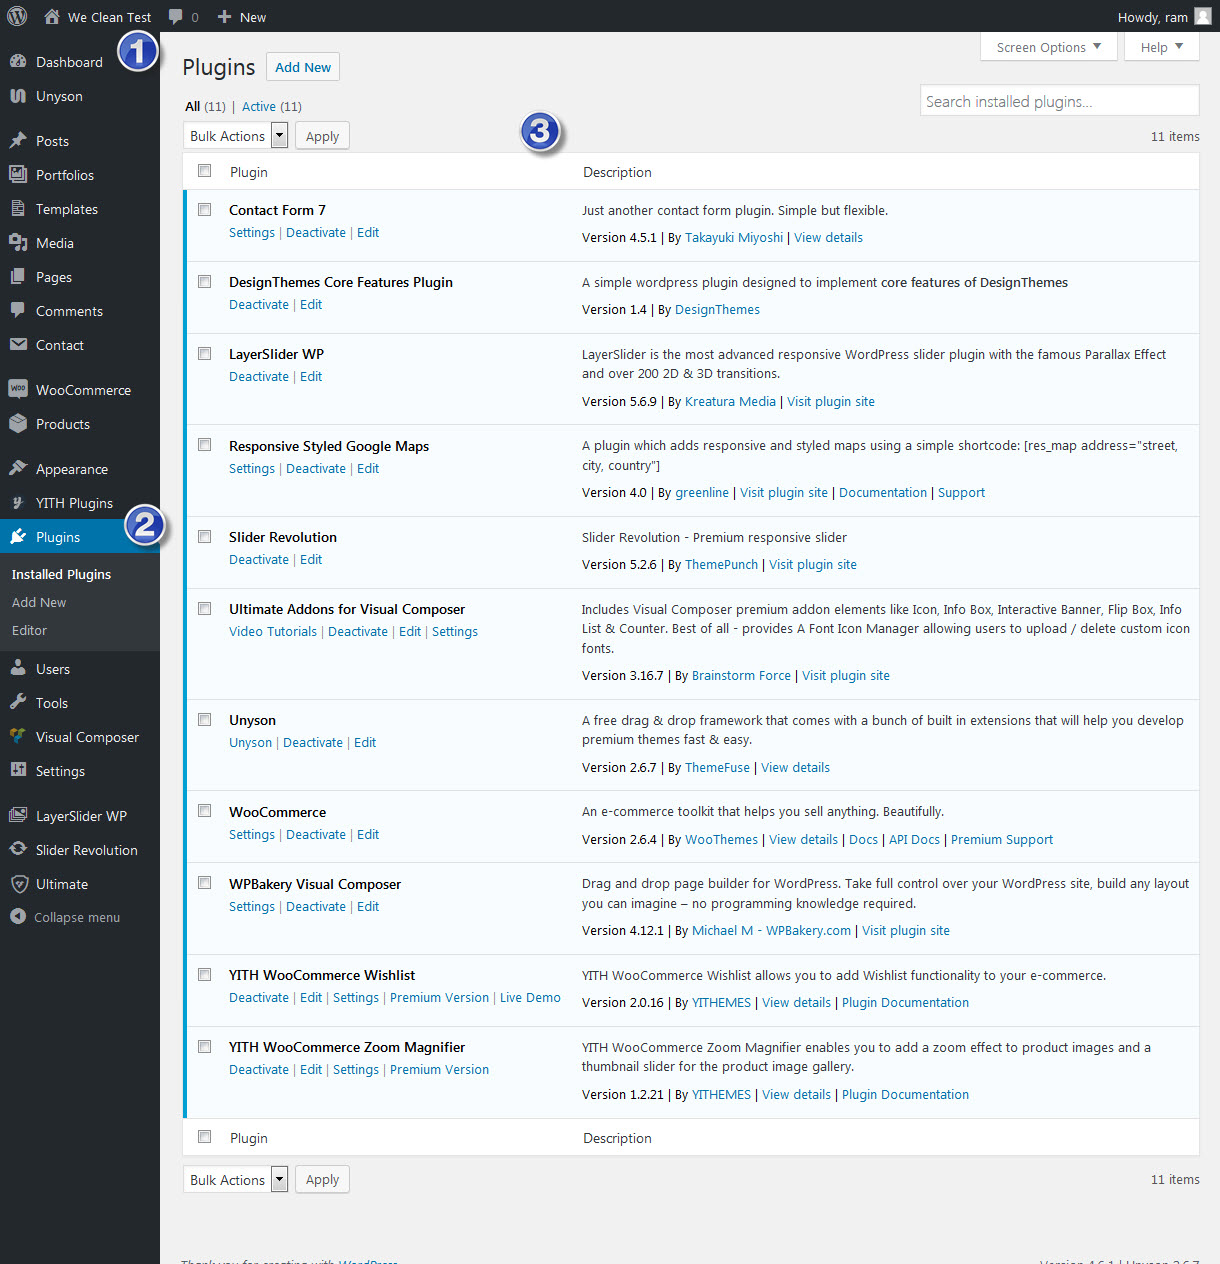
Once We Clean theme is installed and activated, you will get a notification message in your WordPress admin telling you to install the required and recommended plugins. Once you have uploaded and activated the theme, install and activate the 'DesignThemes Core Features Plugin' immediately. All promoted features will work properly, after activating this plugin only.
Plugins packed with theme
- DesignThemes Core Features Plugin - comes by default with theme.
- WPBakery Visual Composer – This is a premium slider plugin created by WPBakery.
- LayerSlider WP - premium slider plugin created by Kreatura.
- Slider Revolution - premium slider plugin created by ThemePunch.
- Responsive Styled Google Maps - google maps plugin created by GreenLine.
Others plugins used by theme
- WooCommerce - an e-commerce plugin created by WooThemes
- YITH WooCommerce Wishlist, YITH WooCommerce Zoom Magnifier - an e-commerce addon plugin created by Yithemes
Others plugins supported by theme
1.10 Theme Update
IMPORTANT: Before you go ahead with the update please check theme changelog and make sure you backup your old theme folder. Download it to your computer locally.
It is the best practice to backup both your files and database regulary and especially before making some serious updates. We recommend using free backup plugins for WordPress like WPOnlineBackup
Update Option 1. Update using WordPress uploader
- Log into your Themeforest account and navigate to your downloads tab. Find the theme and download "Installable WordPress file".
- Log into your wordPress website and go to Appearance -> Themes
- Activate a different theme. Delete the previous version of We Clean and re-upload the new Wordpress Installable files that you have downloaded from Themeforest in the 1st step.
- Once it uploads, choose to activate the theme.
- Update the included plugins if you see a notification message letting you know the plugins have a new version.
Update Option 2. Update using FTP client
- Log into your Themeforest account and get the last version of the theme as described above.
- Connect to your server using desktop client software(we recommend CyberDuck and Filezilla)
- Change directory to /wp-content/themes
- Remove existing folder with old theme files
- Unpack theme installable files downloaded from themeforest and upload to themes folder
- Update the included plugins if you see a notification message letting you know the plugins have a new version.
2. Demo content
The easiest way to import our demo content is to use our Demo Content Importer. Our importer will give you all pages and posts, several sample sliders, widgets, Buddha Theme Options, assigned pages, and more. This is recommended to do on fresh installs. It will not replace content like posts, pages, portfolio, etc , it will not delete current menus but configure our demo menus, and it will not replace but add sliders. It will, however, replace Theme Options, Reading settings and Widget settings.
When you first install any WordPress theme, it will not contain all the extra content that you might have seen in the live (demo) site. There are two ways you can import the We Clean Demo Content; the entire demo with all the settings through our Theme Options Importer, or importing only individual pages. Usually you have to import an XML file, which can be troublesome. We've made it easier by creating a Theme Options Demo Content Importer.
Importing the Demo Content
Before running the importer, make sure that you have installed and activated the required and recommended plugins. You will see a message at the top of your dashboard if you have not yet done so.
- First of all, make sure that you have installed and activated the "DesignThemes Core Features Plugin" on your Wordpress.
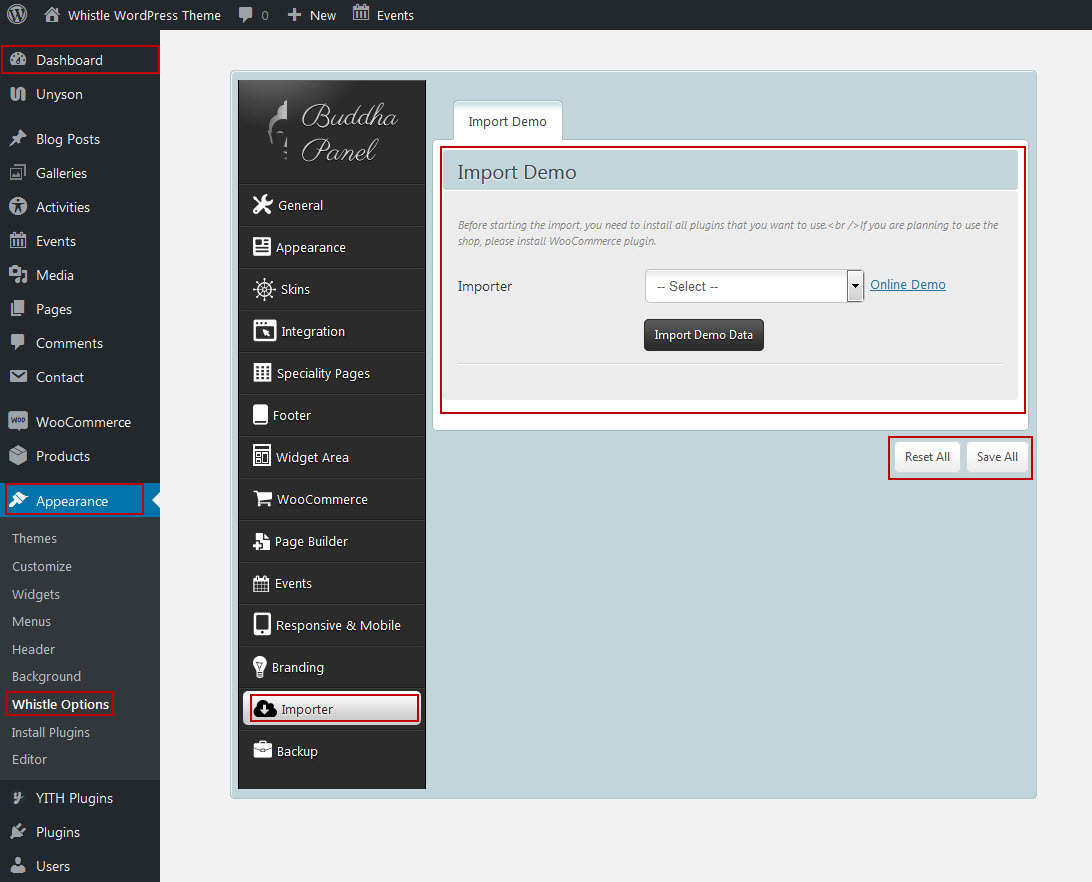
- Goto Appearance -> We Clean Options -> Buddha Panel -> Importer > Import Demo
- Please be patient, as it may take few minutes to import everything. Once it is completed, you will receive a success message finally.
Note : "Error : Failed to import Media …. : If you get 'Failed to import Media "XXXX"' error like this, Nevermind, those errors !! However you'll have the dummy or placeholder images for each of those items instead.
How to Install the Demo Content via Unyson plugin
The easiest way to import our demo content is to use Unyson plugin Demo Content Importer. Our importer will give you all pages and posts, several sample sliders, widgets, Theme Options, assigned pages, and more. This is recommended to do on fresh installs.
It will replace content like posts, pages, portfolio, etc , it will not delete current menus but configure our demo menus, and it will not replace but add sliders. It will, however, replace Theme Options, Reading settings and Widget settings. To import our demo content, please see the steps below.
How To Import Demos
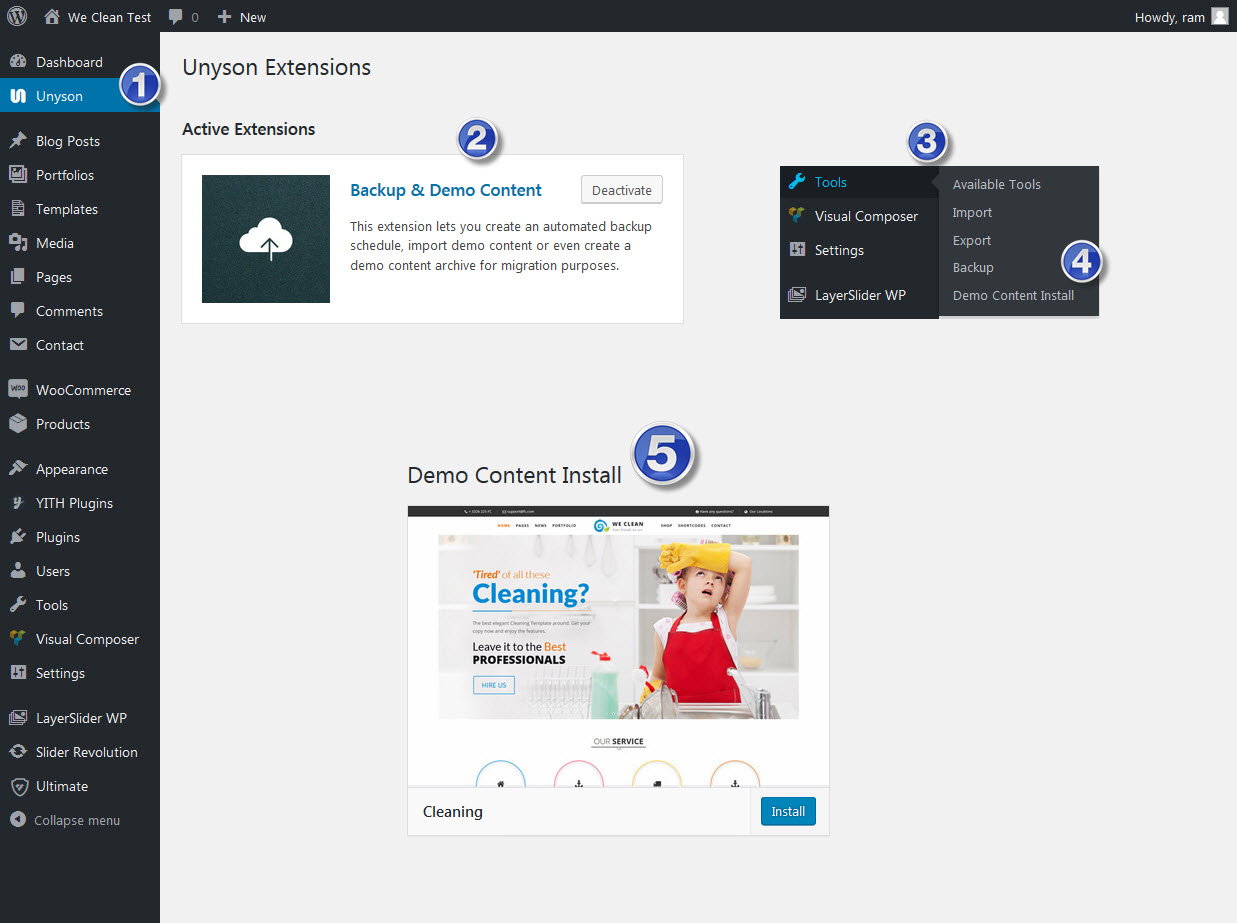
- Install and activate these plugins before you proceed: Revolution Slider, Layer Slider, Designtheme Core Plugin , Unyson plugin and WooCommerce. Woocommerce is only needed for an online shop
- Navigate to the Unyson > Active Extensions > Backup & Demo Content (Install)
- Navigate to the Tools > Demo Content Install > Select the demo Content > install
- Please be patient, as it may take few minutes to import everything. Once it is completed, you will receive a success message finally.
How To Setup The Header
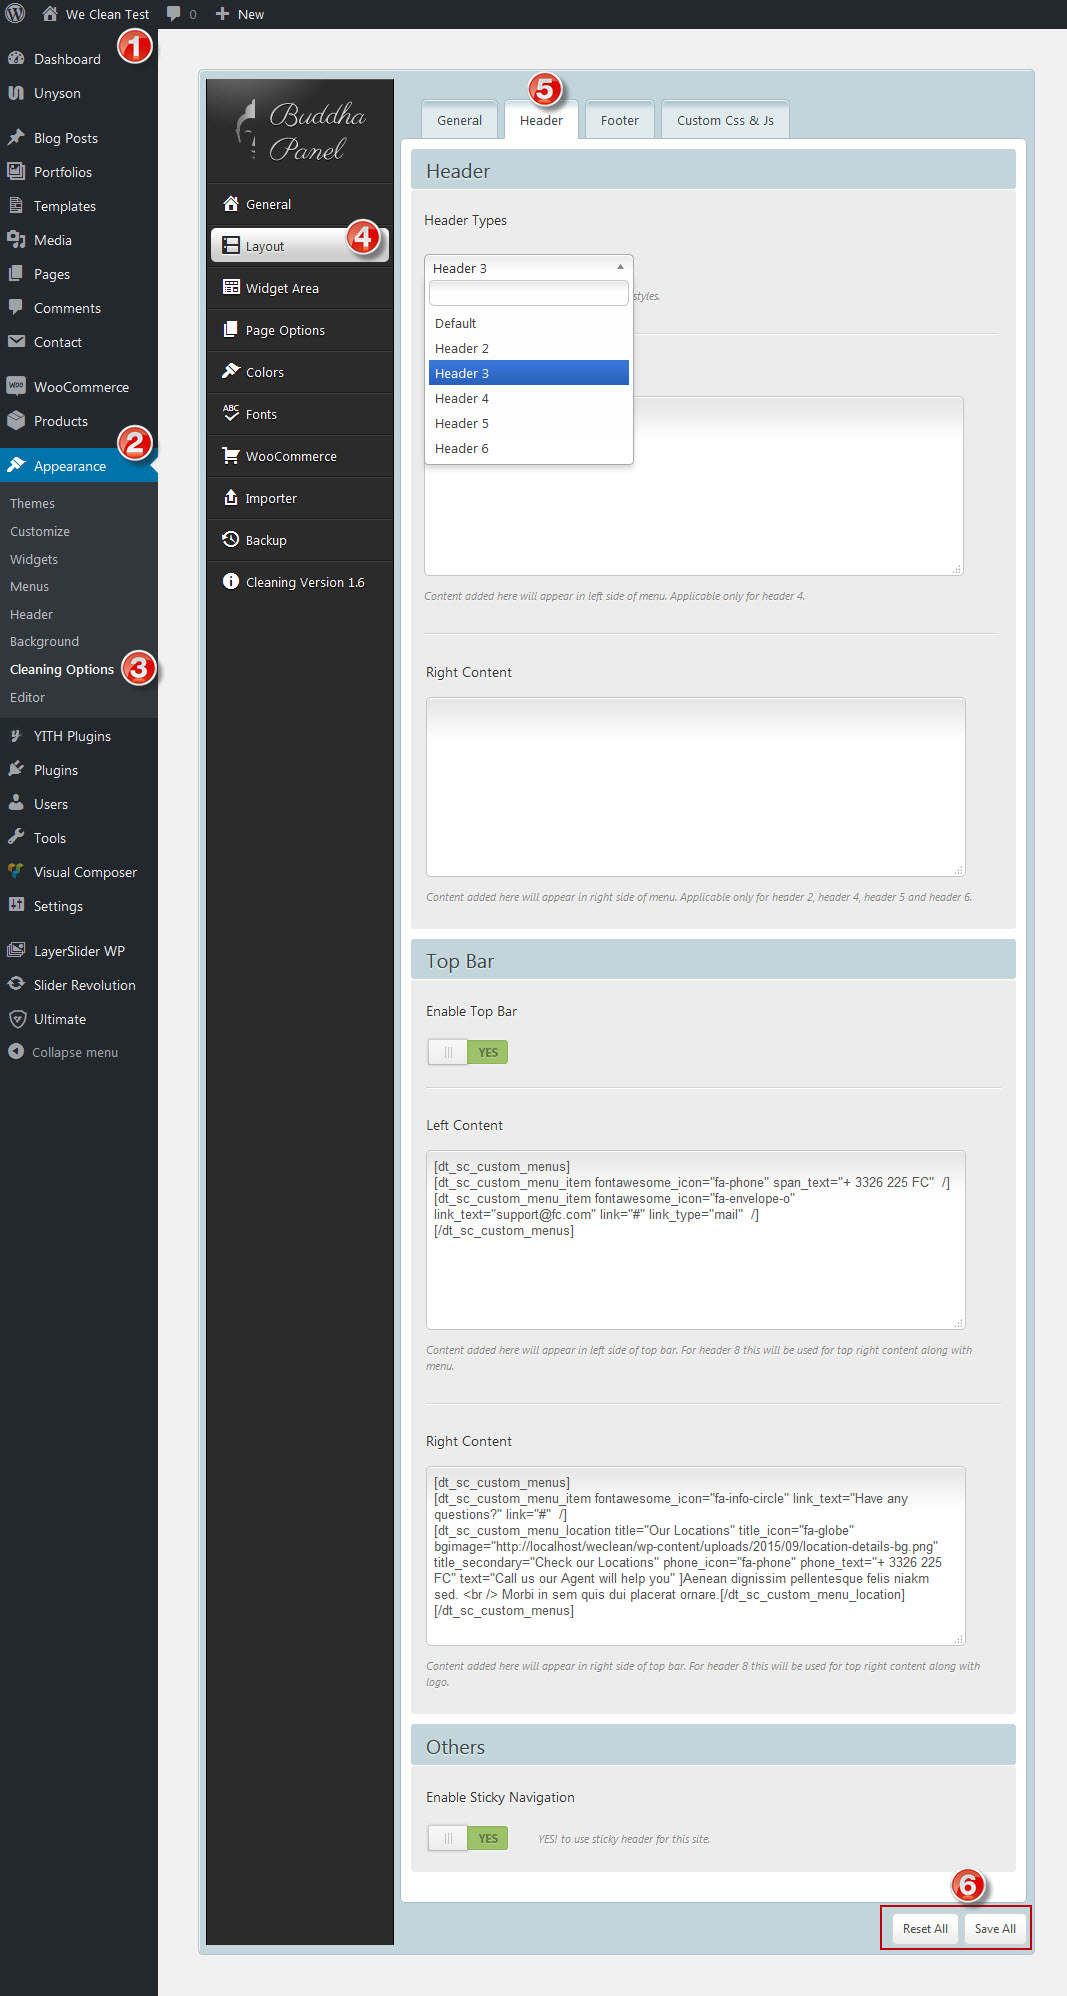
Step 1 – Navigate to Appearance > Theme Options > Layout > Header to access the header options.
Step 2 – Expand the Header Content sub-panel and select your desired Header Position setting.
Step 3 – If you've selected Top as your Header Position, don't forget to choose your Header Layout and Slider Position. See below for more information.
Step 4 – If you've selected Left or Right as your Header Position, don't forget to set your Header Content details. See below for more information.
Step 5 – If you'd like to upload a background image for your header, then you can do so by going to the Header > Header Background Image sub-panel.
Step 6 – To customize your header's appearance and styling, then you can do so by going to the Header > Header Styling sub-panel.
5. Pages creation
Pages are the backbone of your website, and most likely you will setup several of them. Pages are a blank canvas that allow you to add content with our shortcode elements. There are different page templates to choose from, each serving a purpose to help you build a finished site.
5.1 Getting Started (How to create new page ?)
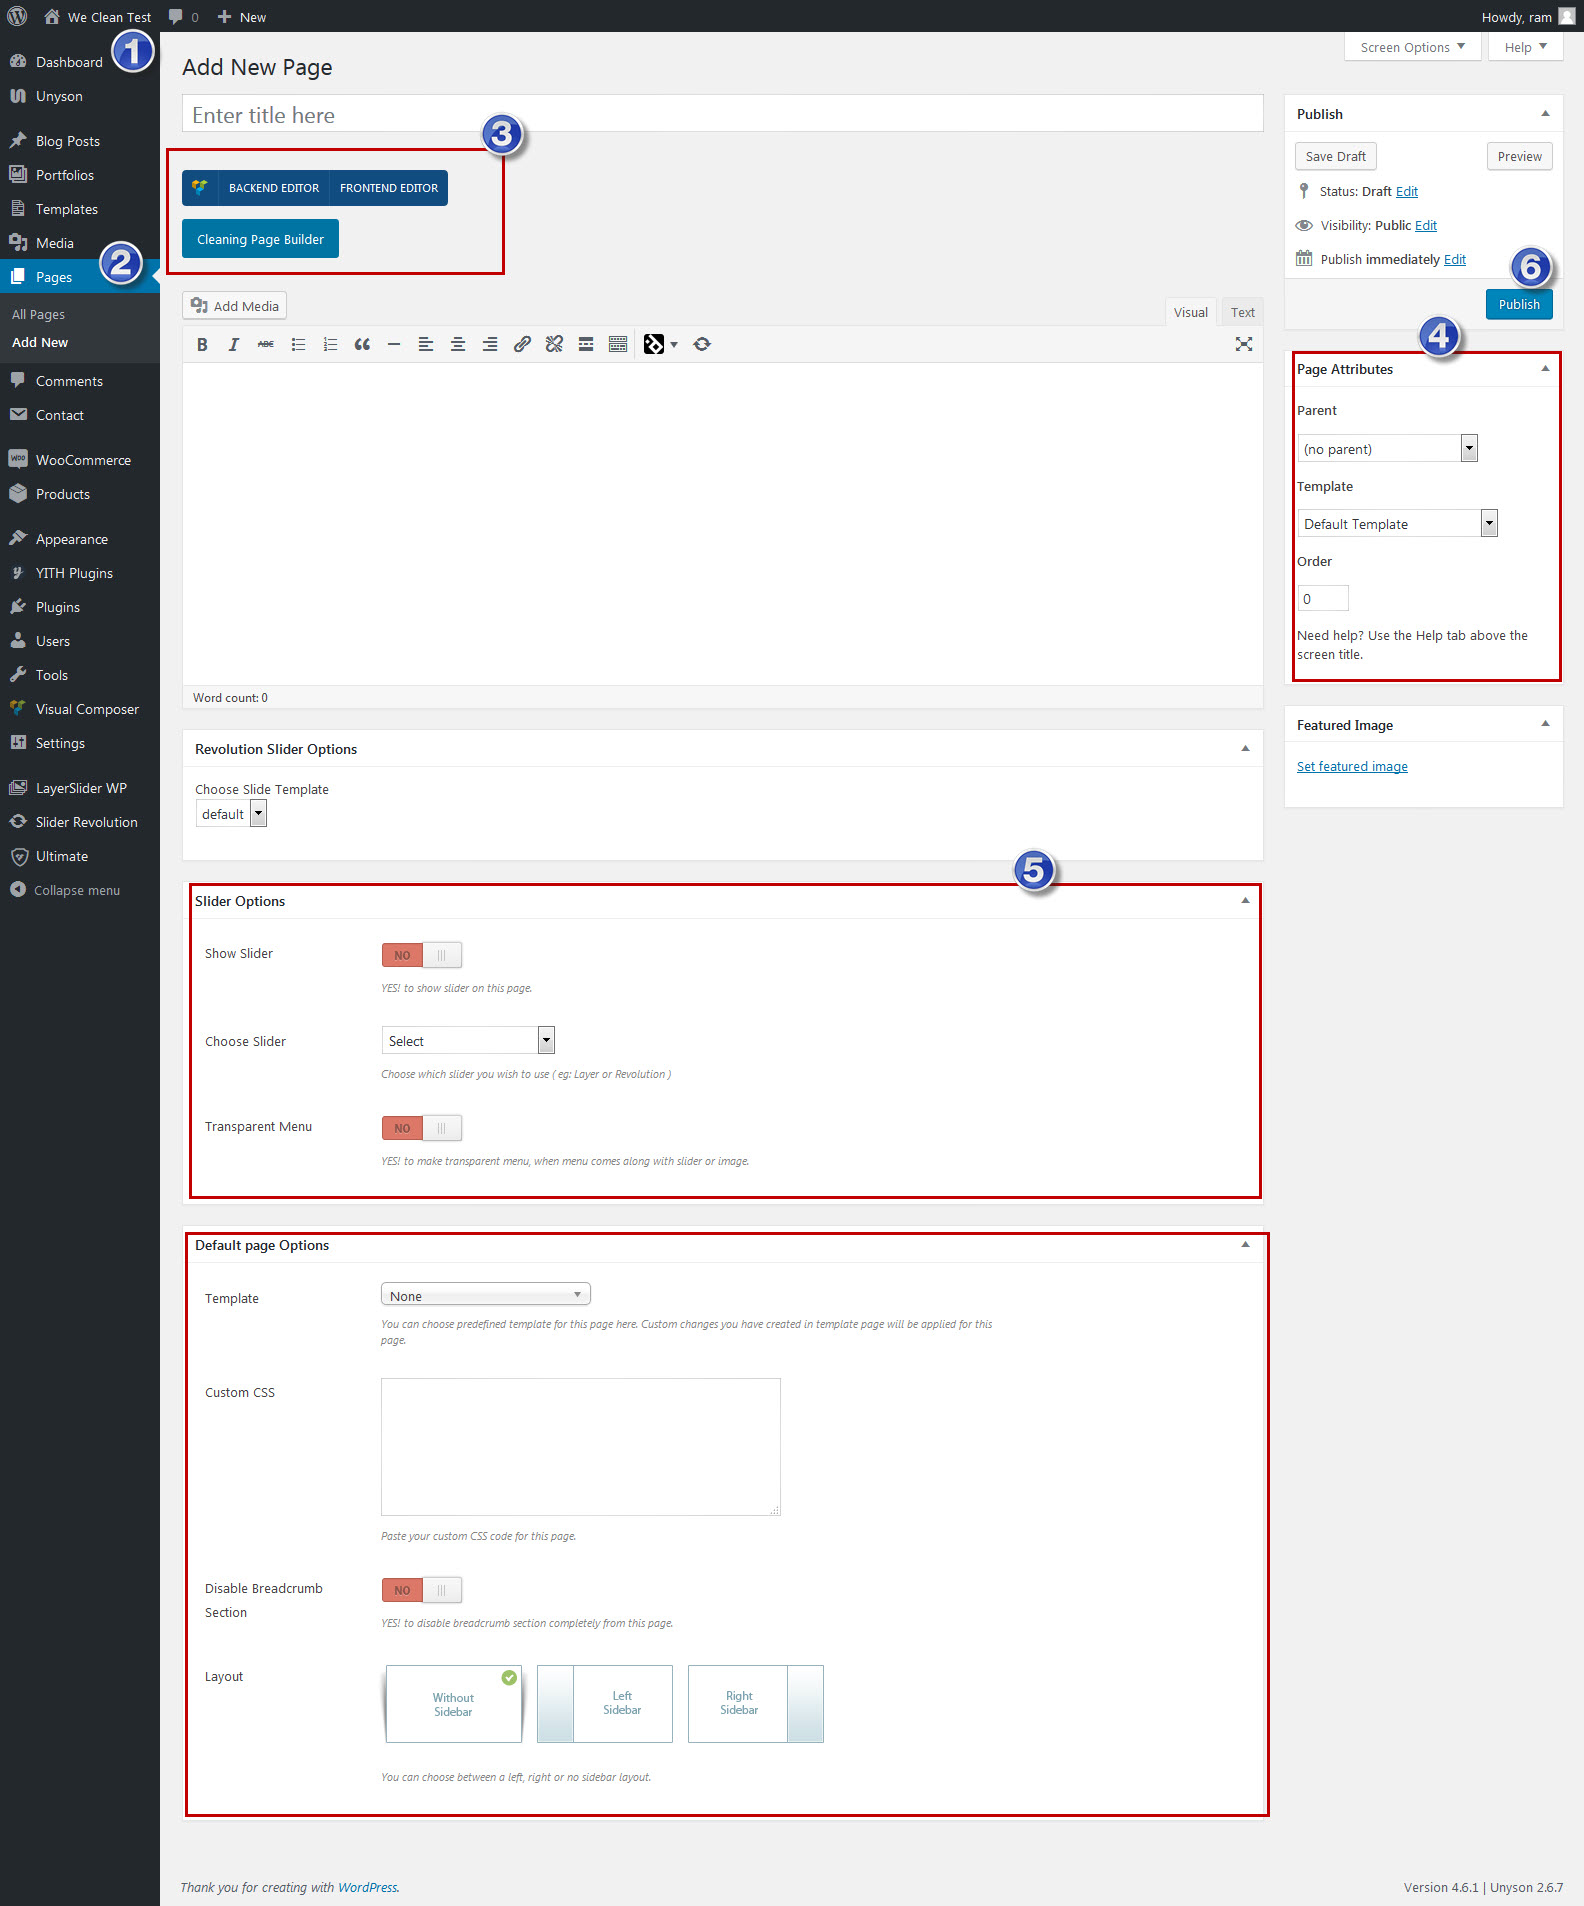
Step 1 – Navigate to Pages in your admin sidebar and click Add New menu.
Step 2 – Input a new name for your page, then find the Page Attributes metabox on the right side.
Step 3 – Set your parent page here. It's usually set to (no parent).
Step 4 – Choose your page template from the Template dropdown list. See list of page templates below.
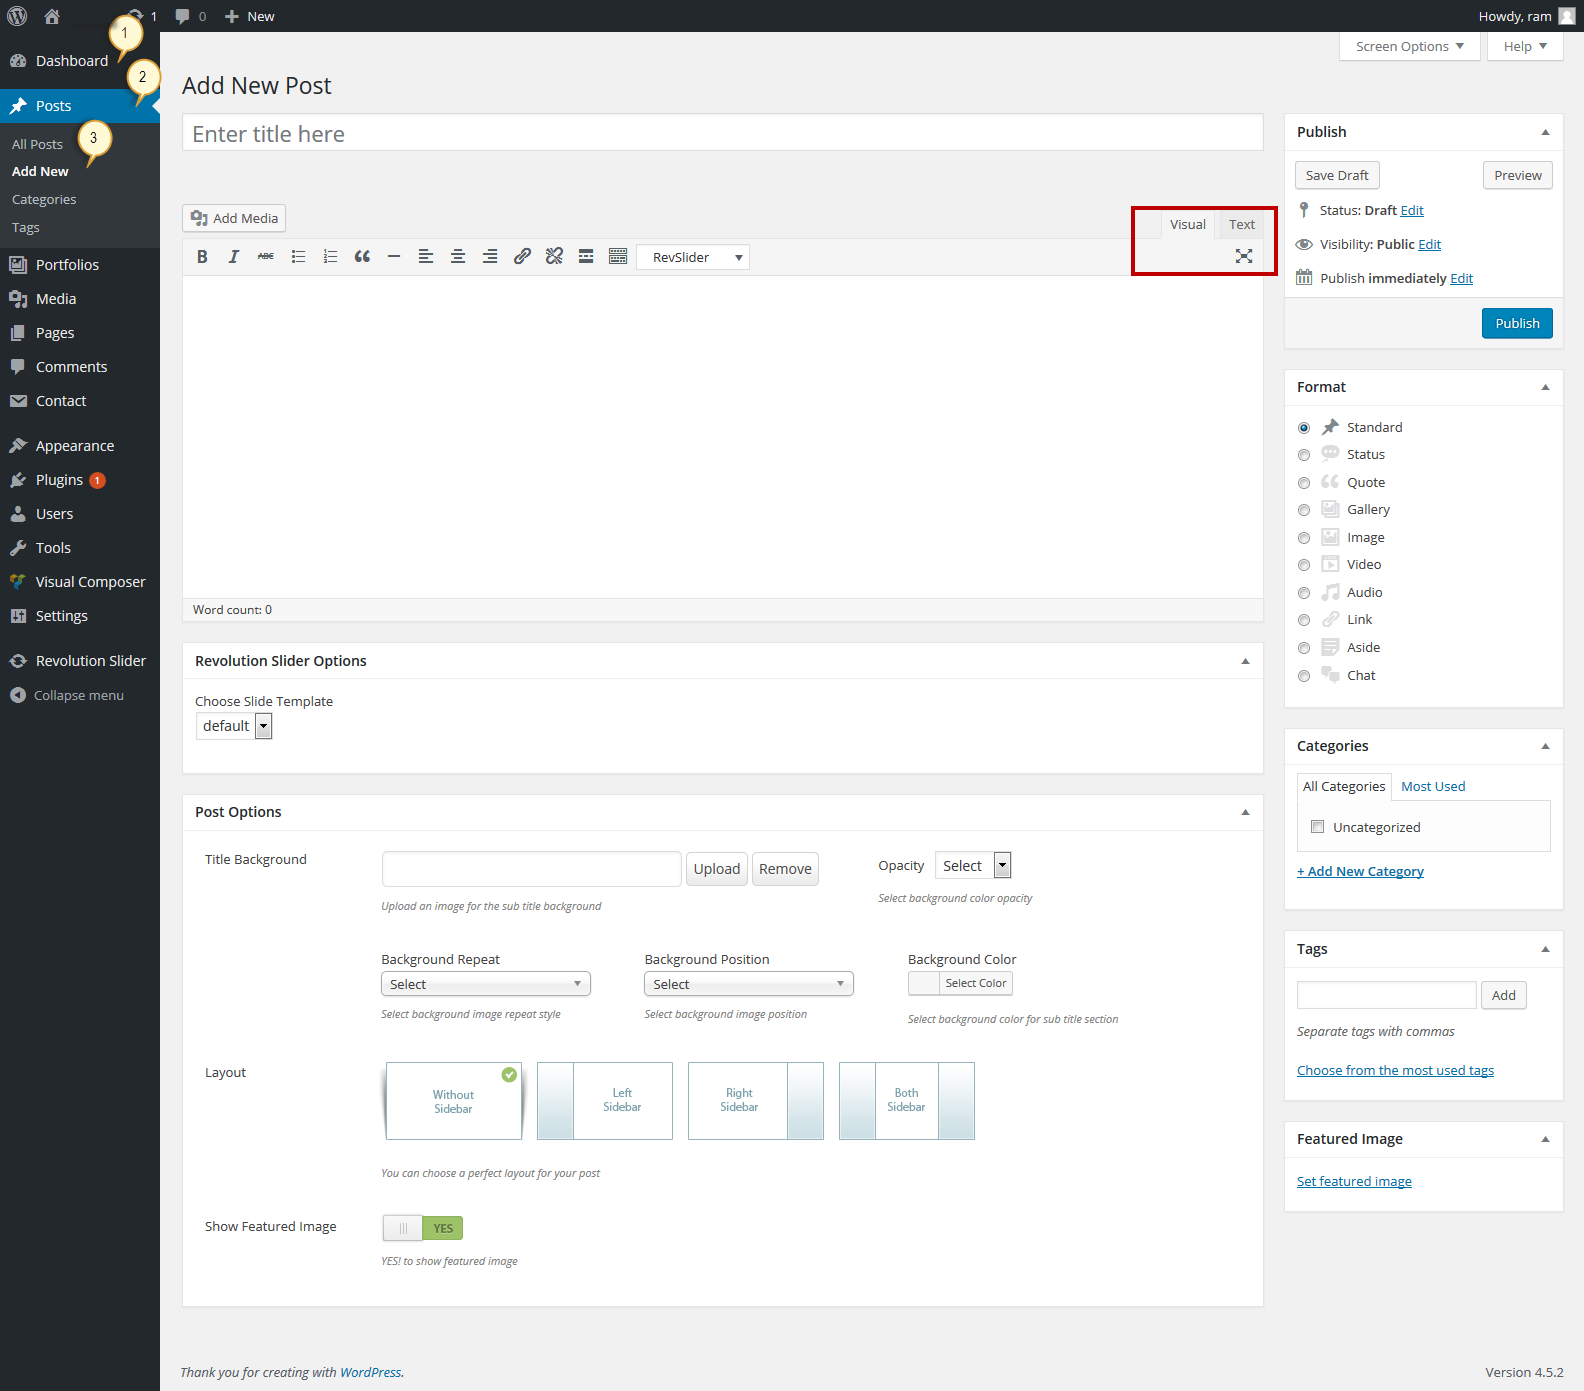
Step 5 – Content for your page goes in the editing field, use the Visual or Text editor or Visual Composer. Page content is mainly built using Shortcodes. See the Shortcodes section for how to use them. You can also use our demo content by importing from buddha panel.
5.2 Page Options
We Clean Theme comes with lots of options to configure each single page.
- We Clean Theme has following slider options 'Layer Slider', 'Revolution Responsive' options.
- You can enable / disable slider at any time.
5.3 Default Page Options
- You can choose an image for title background.
- You can switch between following available page layouts 'Without Sidebar', 'Left Sidebar' and 'Right Sidebar'. You can choose the custom widget area created using 'Widget Area' tab in Buddha Panel( Dashboard -> Appearance -> We Clean Options -> Widget Area Tab ) and you can enable / disable the default widget area.
- You can enable / disable the comments section here.
6. Post Options
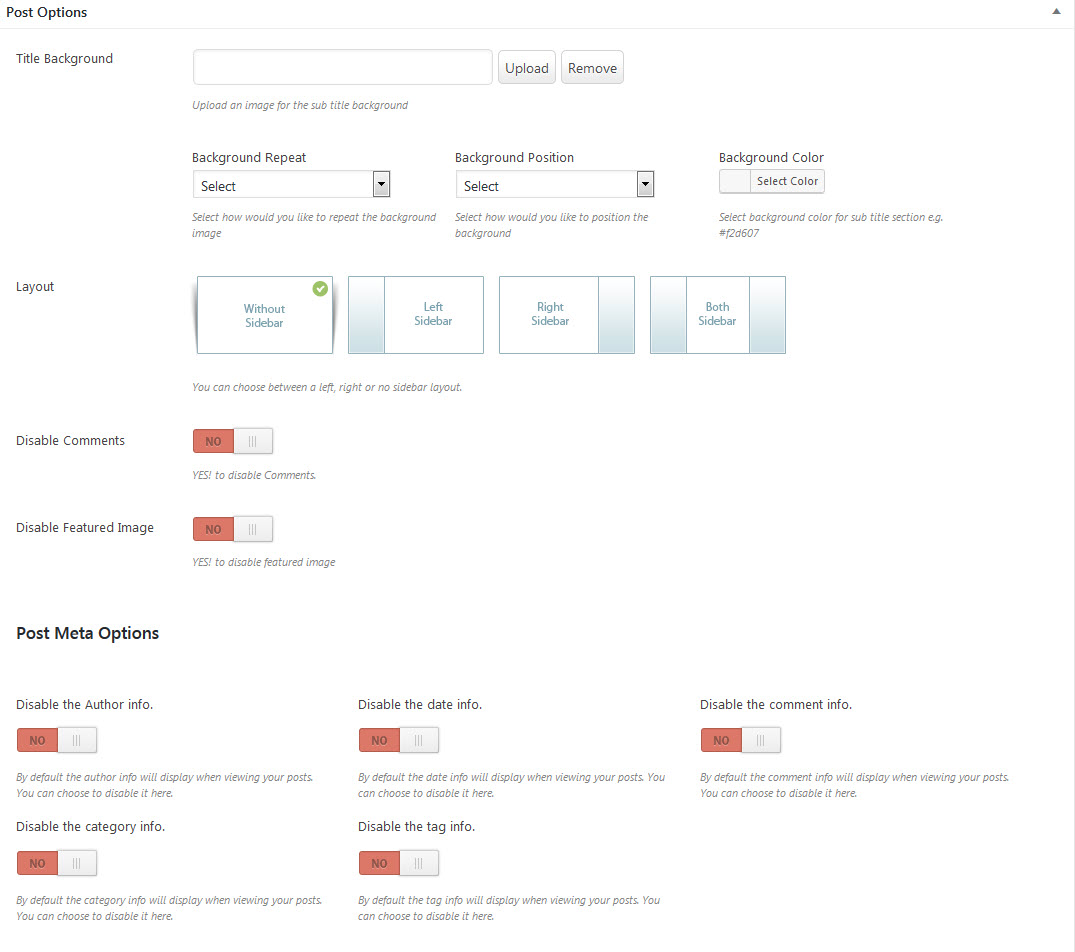
In addition to all the standard Page Options, We Clean offers several Post Options for you to use for each blog post. These options allow you to set different settings for each individual post. When creating or editing a post, scroll below the WordPress editing field to find the Post Options.
Blog Single Post Options
You can configure each single blog post with following options
- You can choose template for your post which is configured in template post type.
- You can switch between following available page layouts 'Without Sidebar', 'Left Sidebar' and 'Right Sidebar'. You can choose the custom widget area created using 'Widget Area' tab in Buddha Panel(Dashboard -> Appearance -> We Clean Options) and you can enable / disable the default widget area.
- Enable / Disable the featured image of the blog post at anytime.
7. Slider
7.1 Layer Slider
LayerSlider WP is a premium multi-purpose slider for creating image galleries, content sliders, and mind-blowing slideshows with must-see effects, even from your WordPress posts and pages. It uses cutting edge technologies to provide the smoothest experience that's possible, and it comes with more than 200 preset 2D and 3D slide transitions. It has a beautiful and easy-to-use admin interface with supporting modern features like drag n'drop WYSIWYG slider builder, real-time previews, timeline view, Google Fonts and transition builder for custom animations. It's device friendly by supporting responsive mode, multiple layouts, touch gestures on mobile devices, and uses techniques like lazy load and conditional script loading for optimal performance. You can add any content into sliders, including images, text, custom HTML, YouTube and Vimeo videos or HTML5 self-hosted multimedia contents. It's also SEO friendly by allowing you to build semantic markup with custom attributes that search engines can index easily. LayerSlider comes with 13 built-in skins, and it has tons of options to entirely customize the appearance and behavior of your sliders at the smallest detail.
LayerSlider is external plugin which is included into theme. Because, for each product we purchase "Extended license" and that`s why we are able to include it into theme. This plugin works fine of course and if you want current slider version, you can always get directly from us. What you need to do, to get this slider is send us a request about it via contact form on our profile's page http://themeforest.net/user/designthemes (it is in the right bottom corner) and we`ll send you the current version.
7.1.1 LayerSlider Features
- Super smooth hardware accelerated CSS3 transitions with jQuery fallback
- Fully responsive & multiple layouts support
- High compatibility with many fallback features for old browsers
- Lazy loading images for better performance
- Unlimited number of layers with image, video, audio, text or custom HTML content
- Powerful API for more customization
- SEO friendly
- Multiple sliders can be added on the same page
- Included free slide transition gallery
- Very detailed documentation with examples
- Unlimited variations of usage (image slider, image slider with text, content slider, video gallery slider, mixed content slider, banner rotator, etc.)
7.1.2 Create A New Layer Slider
Step 1 – Click on the Layer Slider sidebar item in your admin section, then click the "Add New" button and give the slider a name.
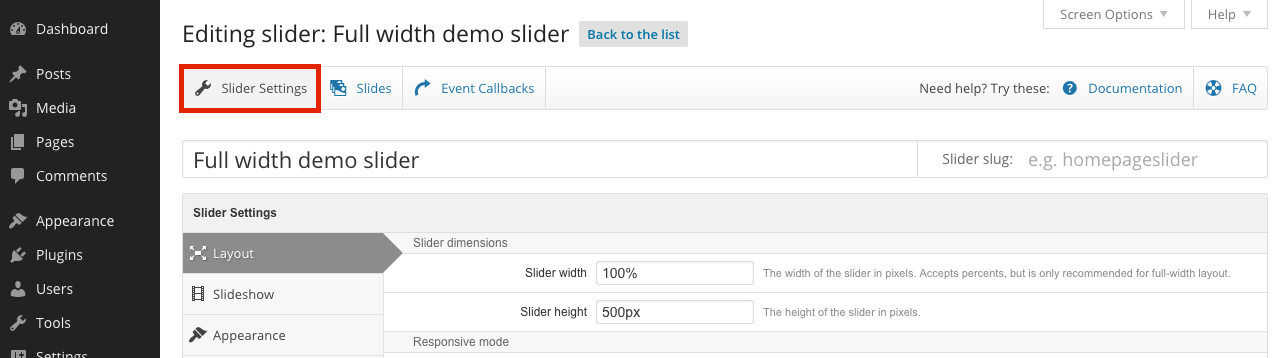
Step 2 – The "Slider Settings" tab will open and allow you to set the general settings for your slider such as the width, height, responsive, full width, and more. Check out each tab.
Step 3 – Once you are done, click "Save Changes" to save the slider. Next you can add slides, see the information below.
Please Note – You can get sample sliders by clicking the "Import Sample Sliders" button. It's a good way to learn and see the different types of settings.
7.1.3 How to add Slides to your slider
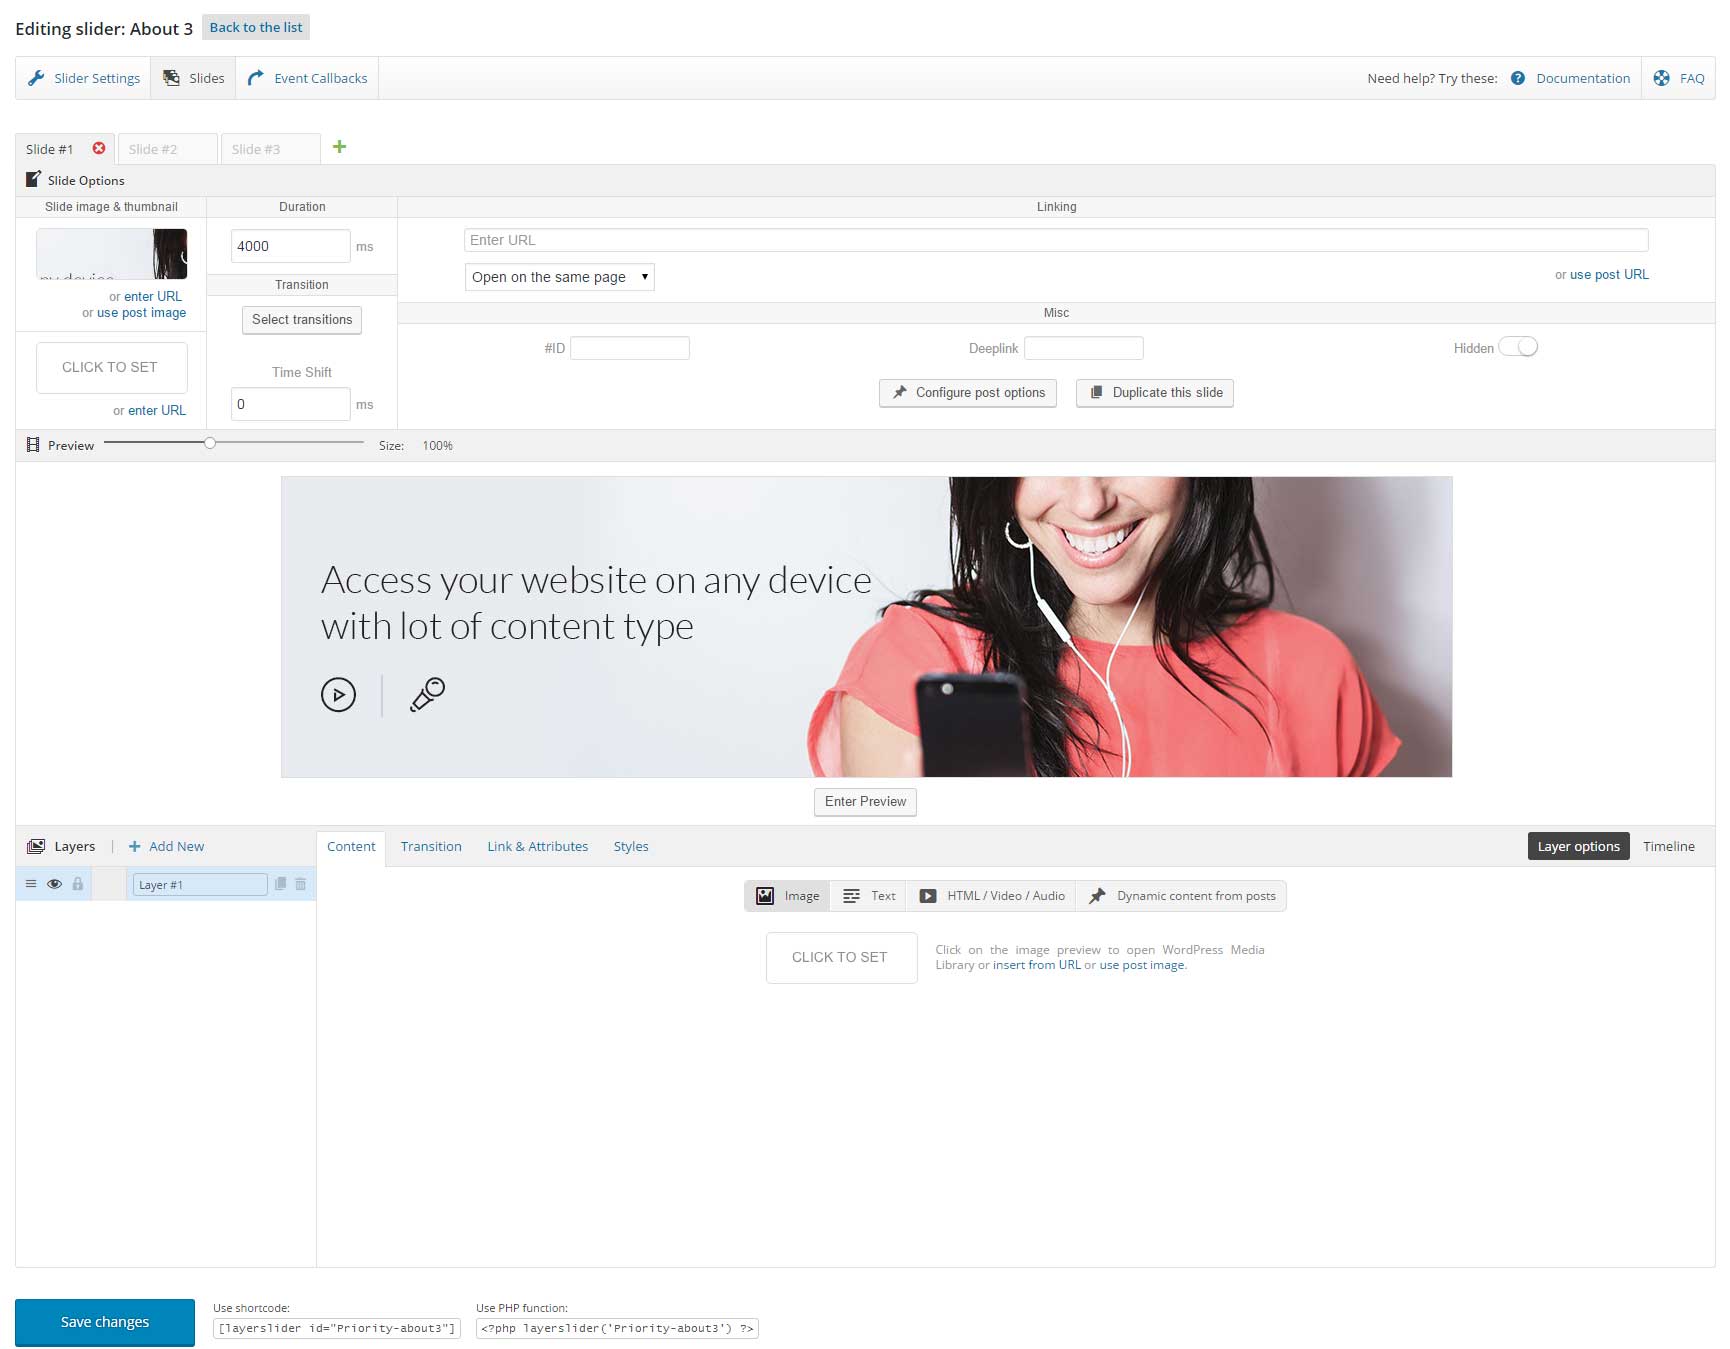
Step 1 – Click on the "Slides" tab.
Step 2 – Slide #1 will already be created, add a background image for the slide, set thumbnails, transitions, links and more in the settings box above the slider preview window.
Step 3 – Each slide you make can have multiple layers to it. The layers show up below the slider preview window. Click "Add New Layer" create a new layer. An editing section will display once clicked.
Step 4 – The layer editing section has 5 tabs; Content, Transition, Link, Styles, Attributes. Content tab is where you add your content, Transition tab is where you set all the timings and animations, Link tab is where you can set the content to link, Styles tab is where you set custom styles, Attributes tab is where you can add custom id's or classes.
Step 5 – Click on the Content Tab and enter your text, image or video or custom HTML content. Then set your transitions, links, styles and attributes if needed.
Step 6 – Click the "Enter Preview" button to view a preview of the slider and layers.
Step 7 – When finished, click "Save Changes" to save it. Repeat process for more slides.
7.2 Revolution Sliders
Revolution Slider:
Revolution Slider is a premium slider available as a WordPress plugin, jQuery plugin, and as a Concrete5 add-on. It's gained huge popularity in the WordPress community due to it's huge range of features and ease of use. In this review we're going to cover just a few of the features of the Revolution Slider WordPress Plugin, and then we'll show you just how easy it is to make your own sliders from scratch.
Responsive Layouts
The plugin is responsive ready and includes multiple slider layout options to make your life easier. Choose from fixed, custom, auto-responsive and full-screen. The Fixed and Custom layout options allow you to set your slider size using exact pixels, and with the Custom option you have additional options to vary the slider size at various screen widths. Or if you don't want to put effort into calculating your sizes, you can use the Auto-Responsive option that will automatically create slides that match the width of your theme (you still need to set the layer container size however). The most unique layout option is Full-Screen. With this option you can create fantastic sliders that literally fill your entire screen, no matter the size of your browser or device (you can even use this option to add full screen sliders with videos for even more impact).
Easy Options
Revolution Slider makes it easy for your to create custom sliders by adding in options for just about everything. Choose your slide delay, navigation arrows, slider location (add margins), add media layers, select slide transition and more all using the drop-down menus throughout the plugin.
Media Support
Add text, links, images and videos with a few clicks of your mouse. This gives you the ability to create information rich slides that your readers and clients will be able to identify with. Plus each of these media types is added as its own layer with unique animations, timing and styles that you set using Revolution Sliders super options. Revolution Slider Guide
First you'll nee to get a copy of the Slider Revolution WordPress Plugin. After you've installed the plugin, it should add a menu item to your main WordPress dashboard. Now you can start building your sliders!
You have two options – begin from scratch, or snag a free export file from the Revolution Slider demo to help get you started (just click on the "Example Files" link on the right upper section of their site). If you choose to import a sample slider, click on the Import button, browse for your sample file and click Upload.
7.2.1 How To Create A New Revolution Slider
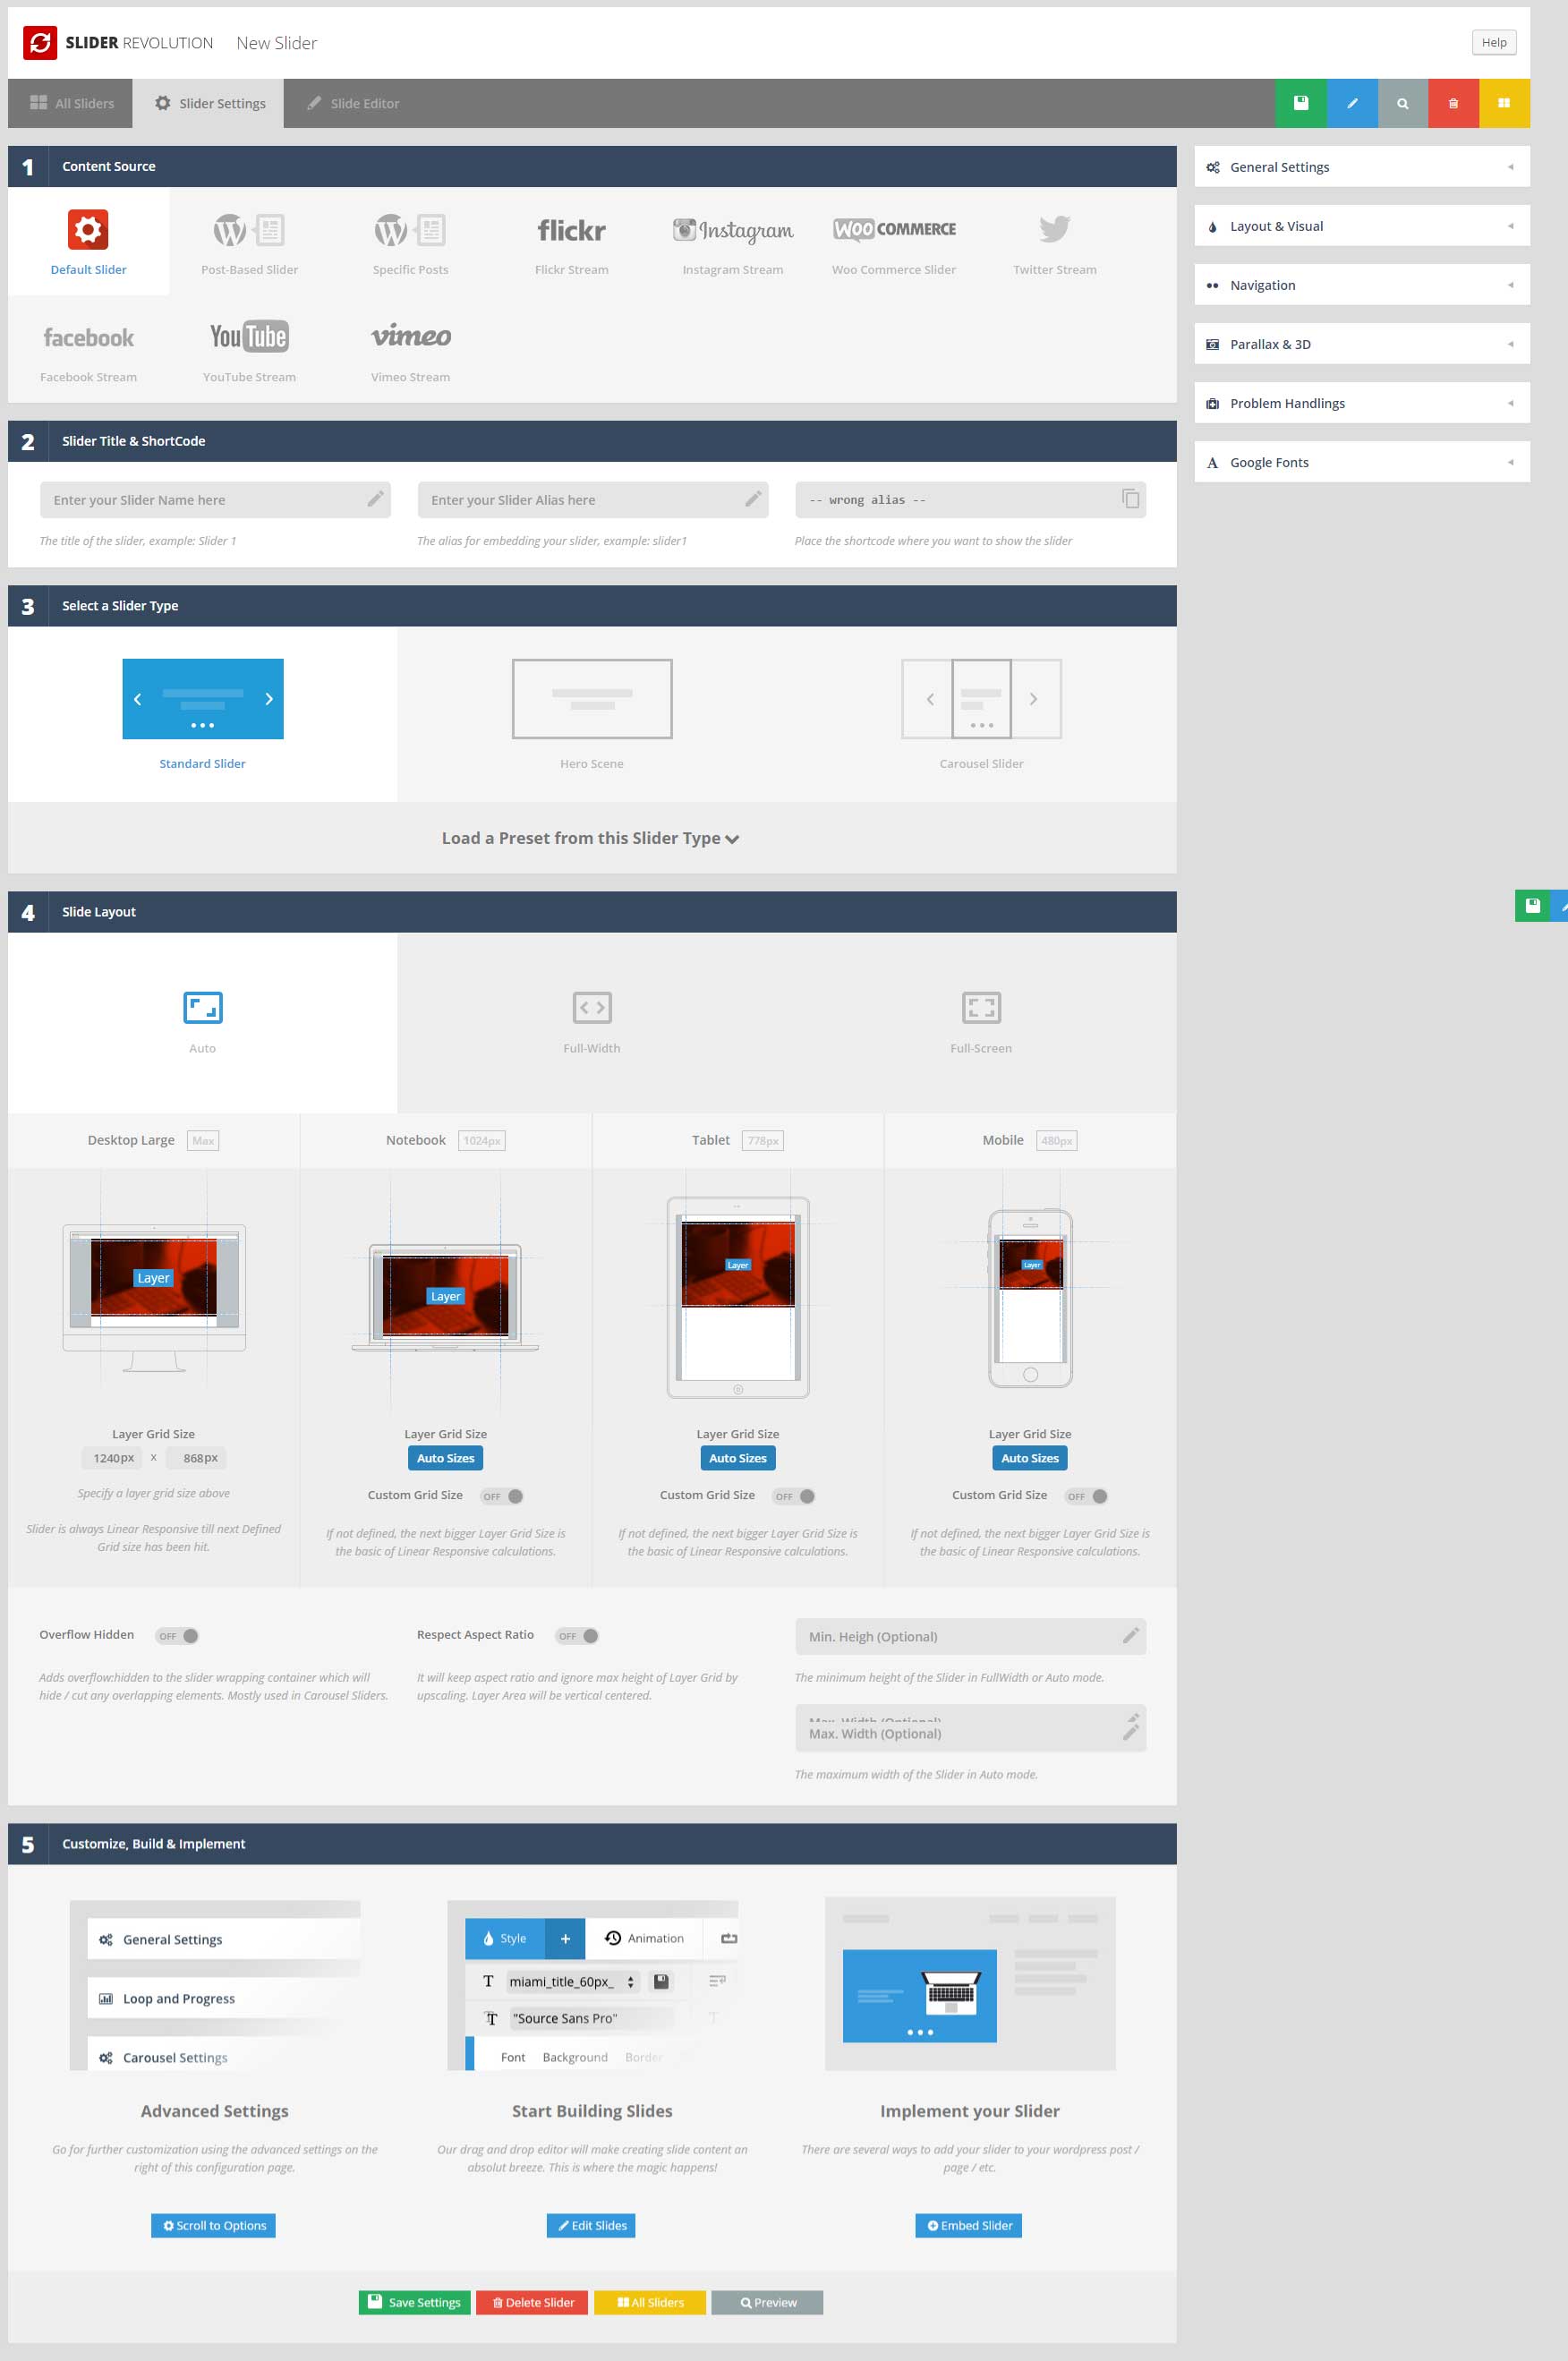
Step 1 – Click on the Revolution Slider sidebar item in your admin section, then click the Create New Slider button.
Step 2 – Insert a slider name and alias. The alias text will generate a shortcode that can be used in the editing field of pages or posts.
Step 3 – Then select the Source Type. If you choose Posts or Specific Posts, please refer to the Revolution Slider Docs for information on how to set that up.
Step 4 – Then select the Slider Layout type, each type will have its own settings. Set the Grid and Responsive settings here also. View the layout example diagram below this area to understand what each section is.
Step 5 – On the right hand side are many other options you can set. All are self explanatory with descriptions. Test them out.
Step 6 – Once you are done, click Create Slider and your new slider will be made.
7.2.2 How To Import Revolution Sliders
Step 1 – Go the the Revolution Slider tab in your WP Admin, and click the Import Slider button.
Step 2 – Choose the .ZIP file of the slider you'd like to import.
Step 3 – Once you've chosen the .ZIP file, an Import Slider button will appear.
Step 4 – Click the Import Slider button, and wait for it to finish uploading.
Step 5 – Once it's finished uploading, you will now see your imported slider in the list of Revolution Sliders available.
7.2.3 How To Export Revolution Sliders
Step 1 – Go the the Revolution Slider tab in your WP Admin, and open the slider you'd like to export.
Step 2 – Switch to the Slider Settings tab on the top of the page.
Step 3 – On the right, you will find the 'Import / Export / Replace' dropdown. Click it to expand the tab and view the options.
Step 4 – Switch to the Export tab, and click the Export Slider button.
Step 5 – Once it's finished downloading, you will receive a .ZIP file of your slider.
8. Buddha Options Panel
Theme options are very important when it comes to the We Clean theme. You must go through all available theme options to make the theme work properly.
- Navigate to Dashboard -> Appearance -> We Clean Options.
- Theme has 9 different types of setting pages with tabs.
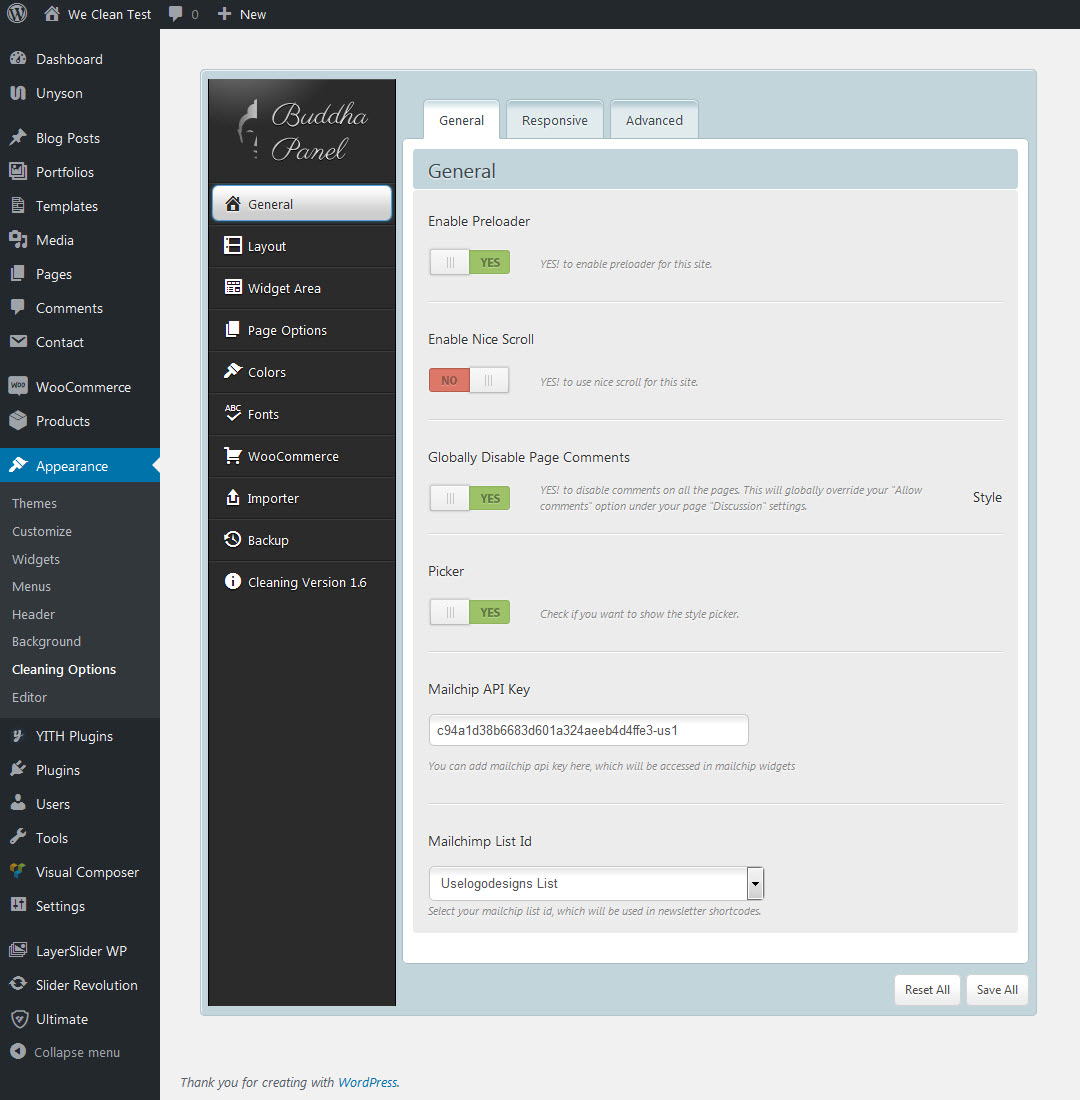
8.1 General Options
General - To configure preloader, nice scroll, style picker, responsive and page builder settings.
General - To configure preloader, nice scroll, style picker,...
Responsive - To configure theme resposive option.
Advanced - To configure theme page builder.
8.2 Layout Options
Here you can change the appearance of the theme.
General - To configure logo, favicon, breadcrumb and page layout (boxed or wide).
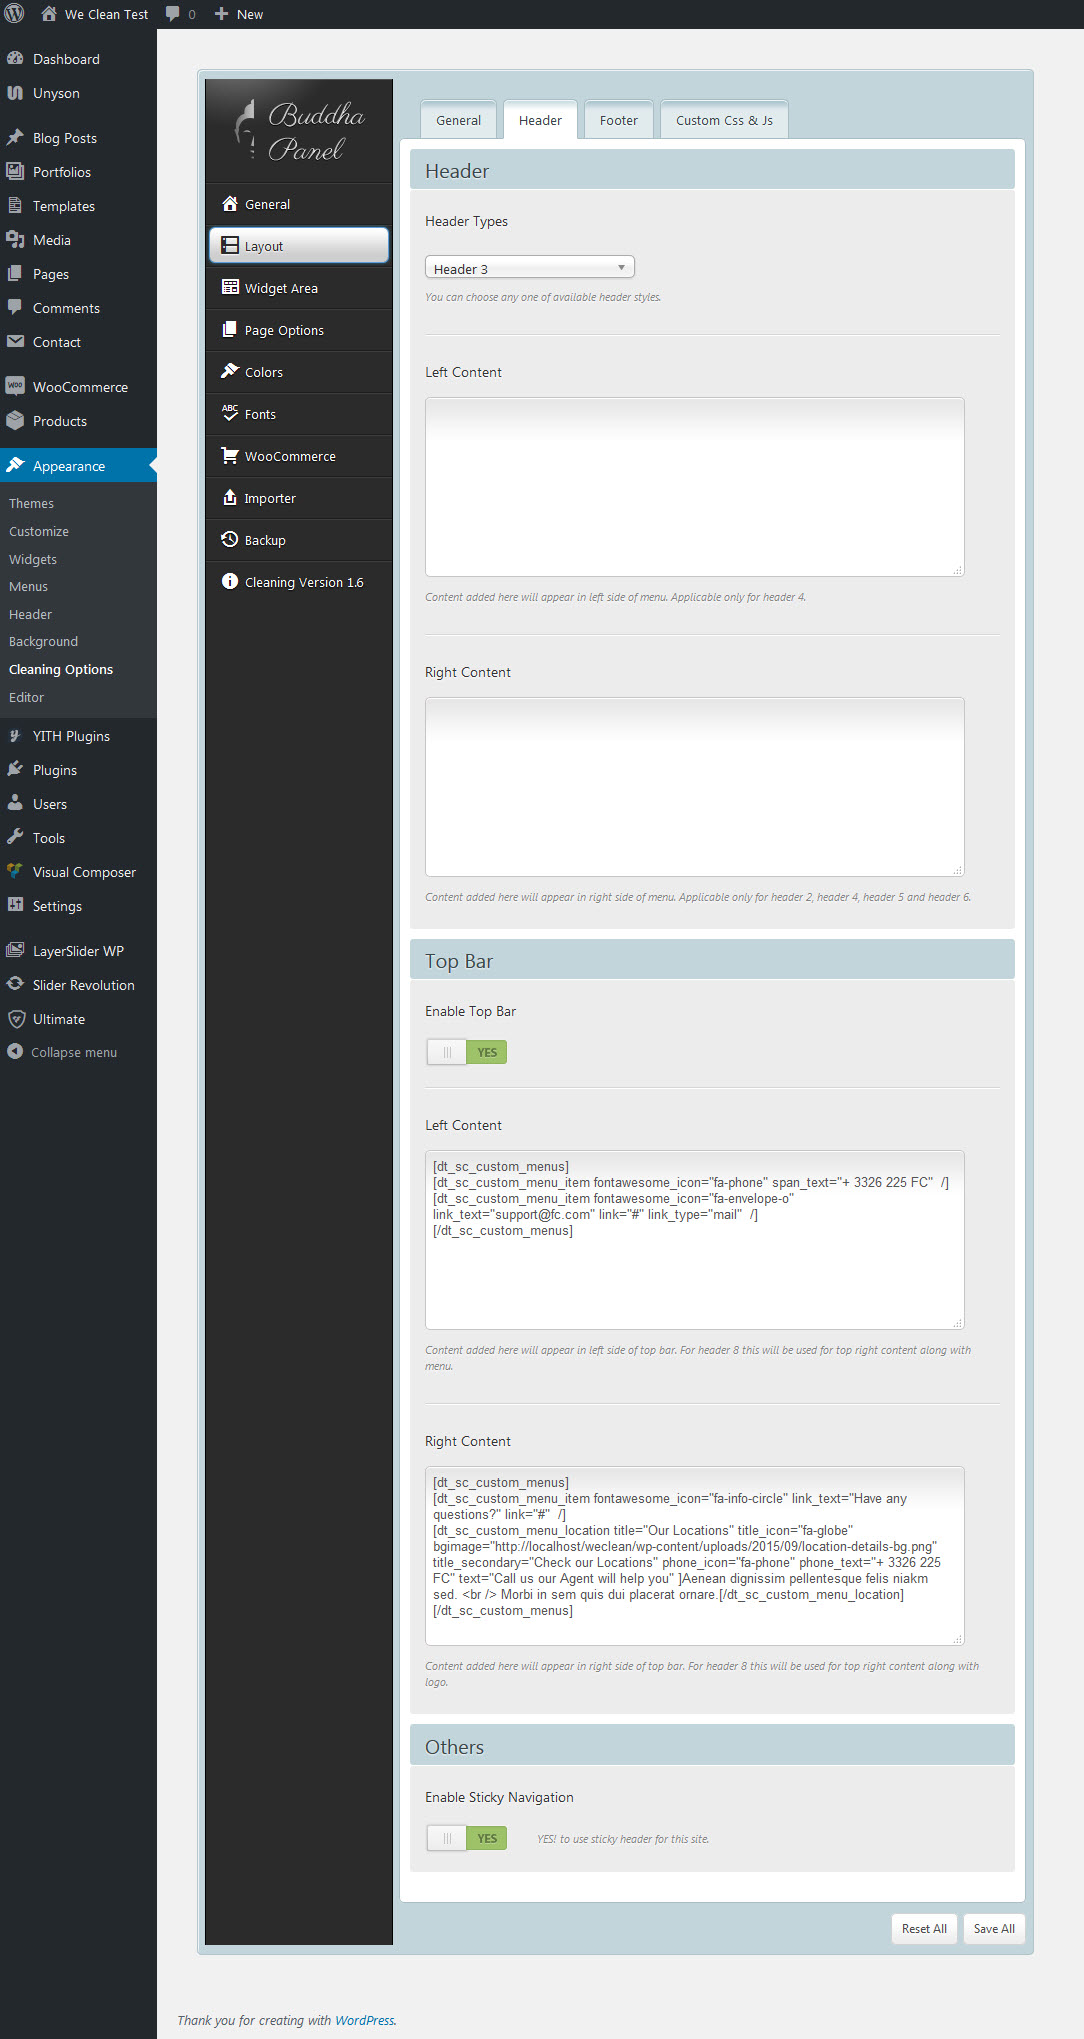
Header - To customize top bar section of theme. Also you can enable sticky navigation for the theme.
Footer - To configure footer layout, copyright section and footer menu of theme.
Custom CSS & Js - To add custom css and js scripts if needed.
8.3 Widget Area Options
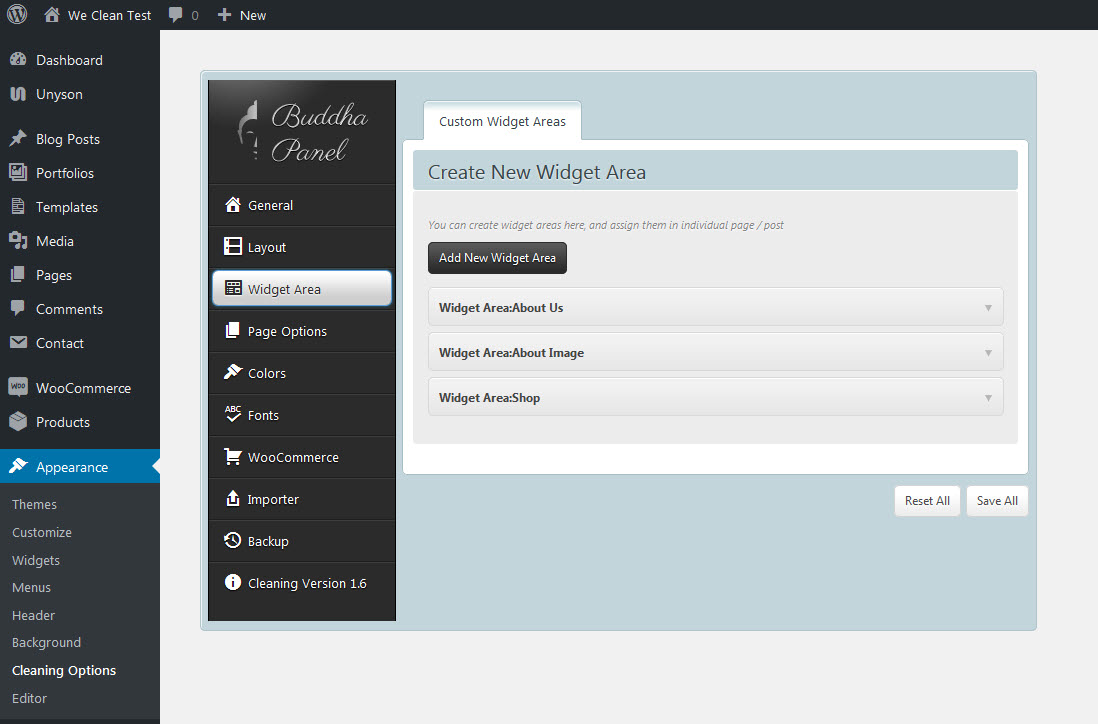
Here you can configure widget areas for Custom widget area.
Custom Widget Areas - These widget areas will be used for left sidebar, right sidebar and mega menu.
8.4 Page Options
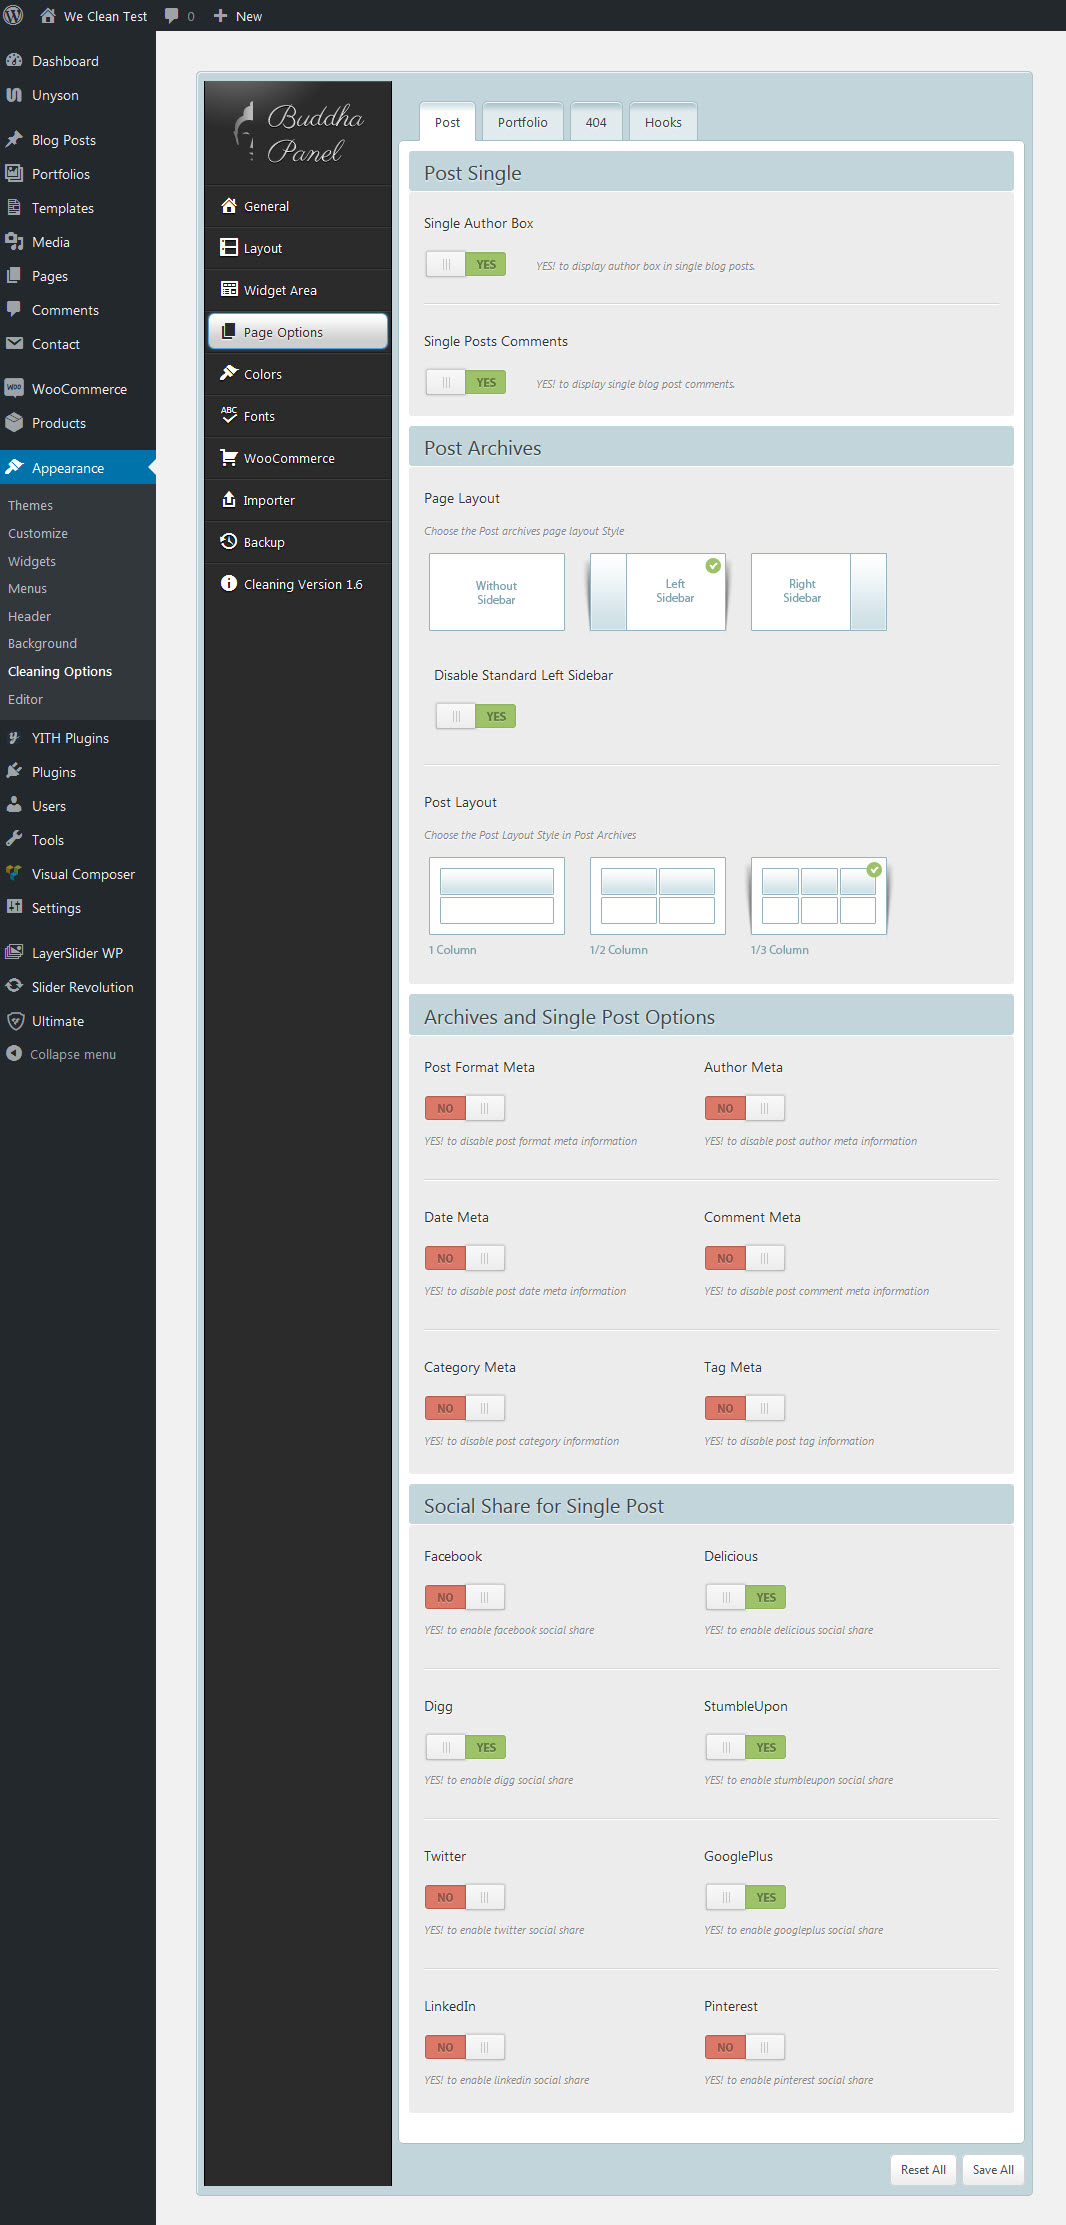
Post - You can configure single post and archive post additional settings here.
Portfolio - You can configure single portfolio, archive portfolios, custom fields and post type slug settings here.
404 - You can configure 404 page layout and custom message here.
Hooks - You can add scripts which will be used in Top, Content Before, Content After and Bottom.
8.5 Colors Options
You can figure colors for the items listed below.
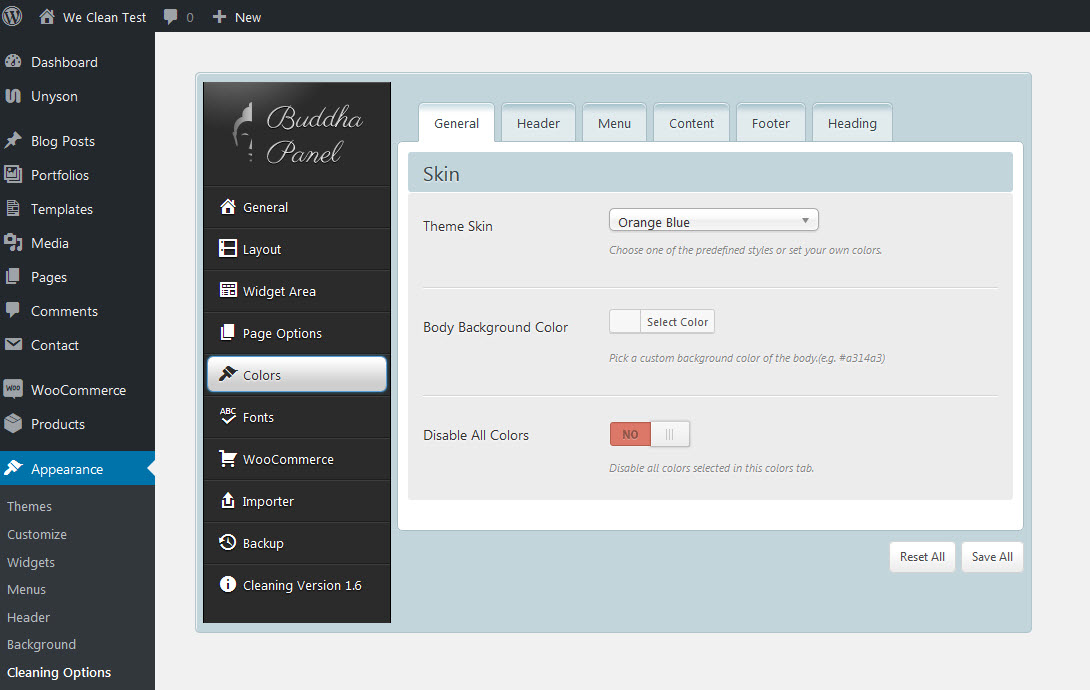
General - You can choose theme skin, background color and enable or disable all color settings.
Header - You can configure background color for Header and Mega Menu. Also you can configure all colors for Top Bar and Breadcrumb.
Menu - You can configure menu and submenu link color, hover color and border color.
Content - You can configure theme color, text color, link color and link hover color.
Footer - You can configure footer theme color, footer background color, copyright background color, text color, link color, hover color and footer heading color here.
Heading - You can configure header color for all heading types(H1, H2, H3, H4, H5, H6).
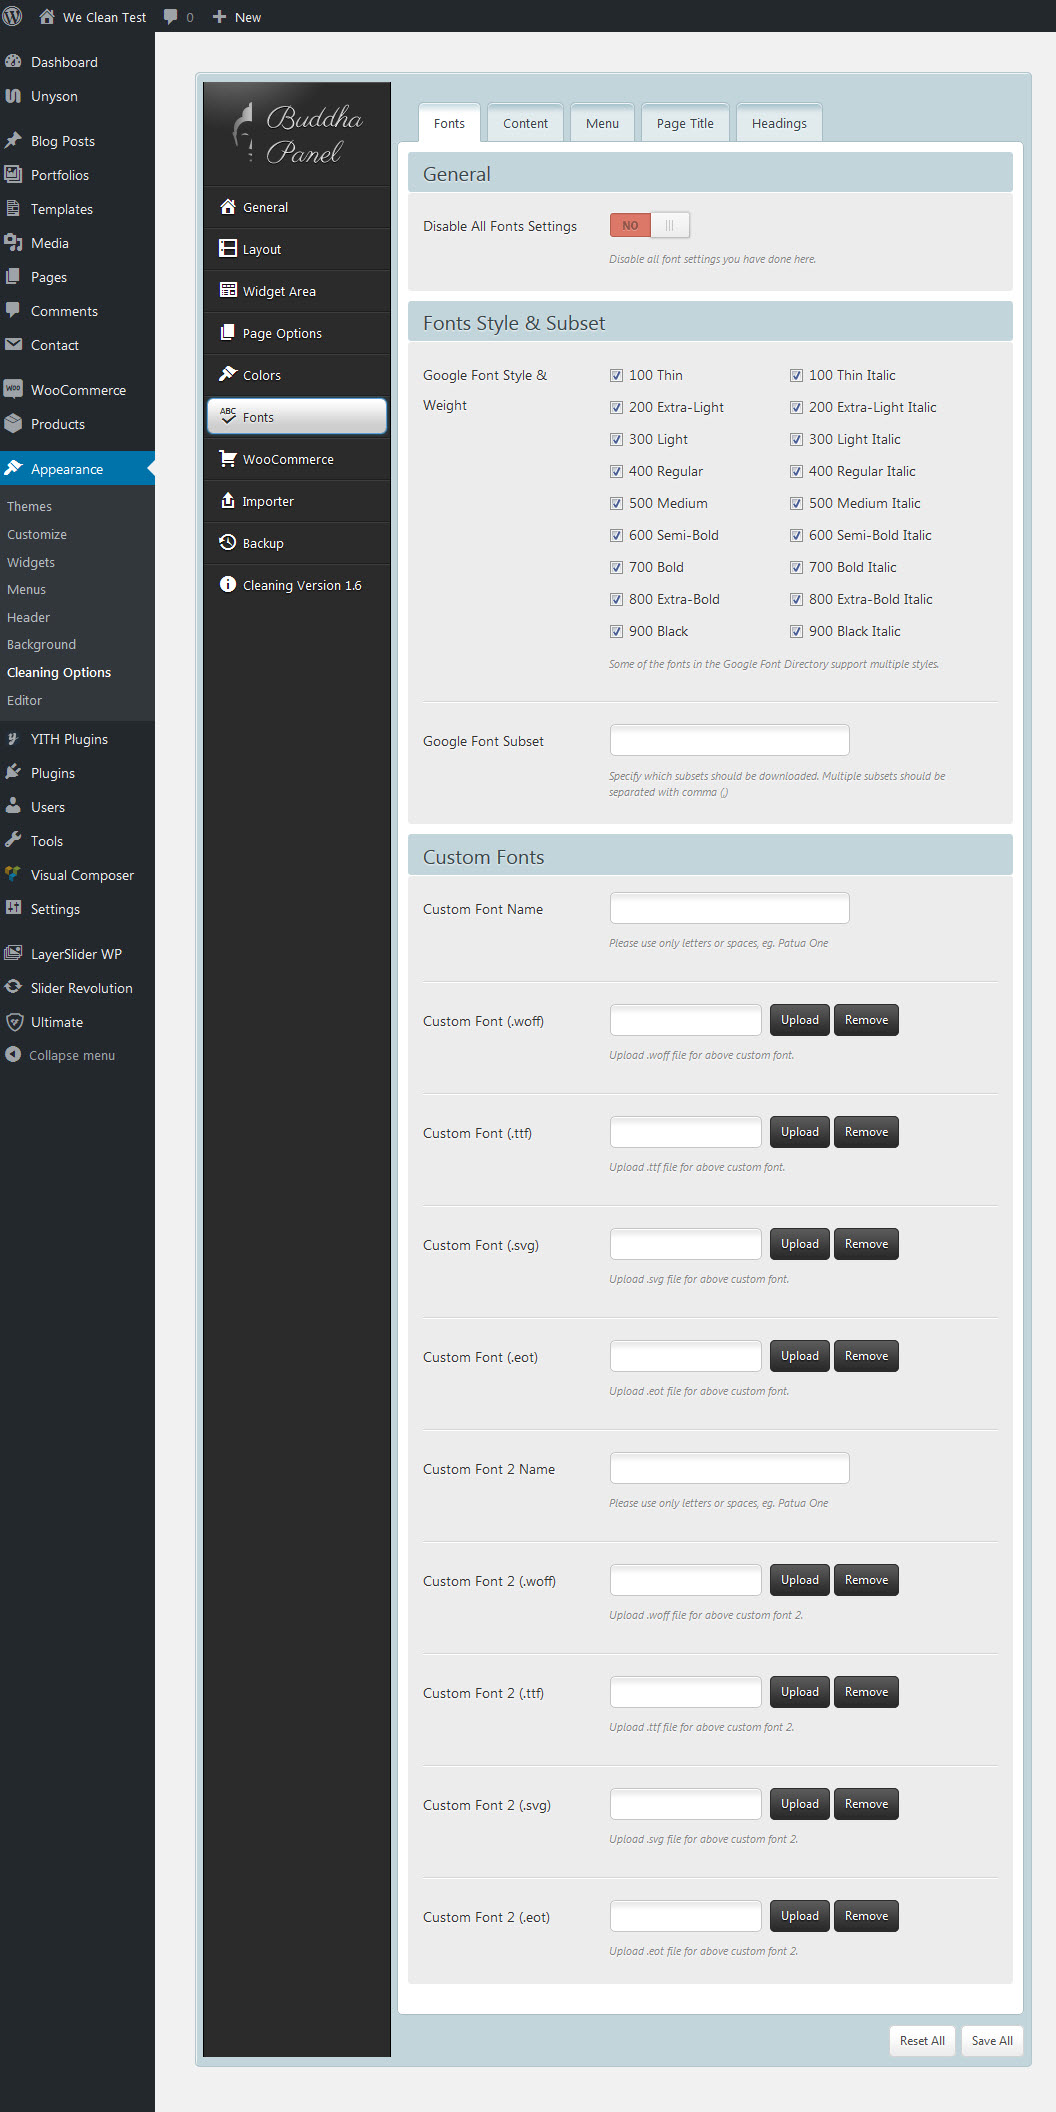
8.6 Font Options
You can configure font settings for all part of your site.
- You can upload your own custom font for your site here and also you can choose font style and google subset.
- You can configure font family, font size, font weight, font style and line height for content, menus, page title and headings.
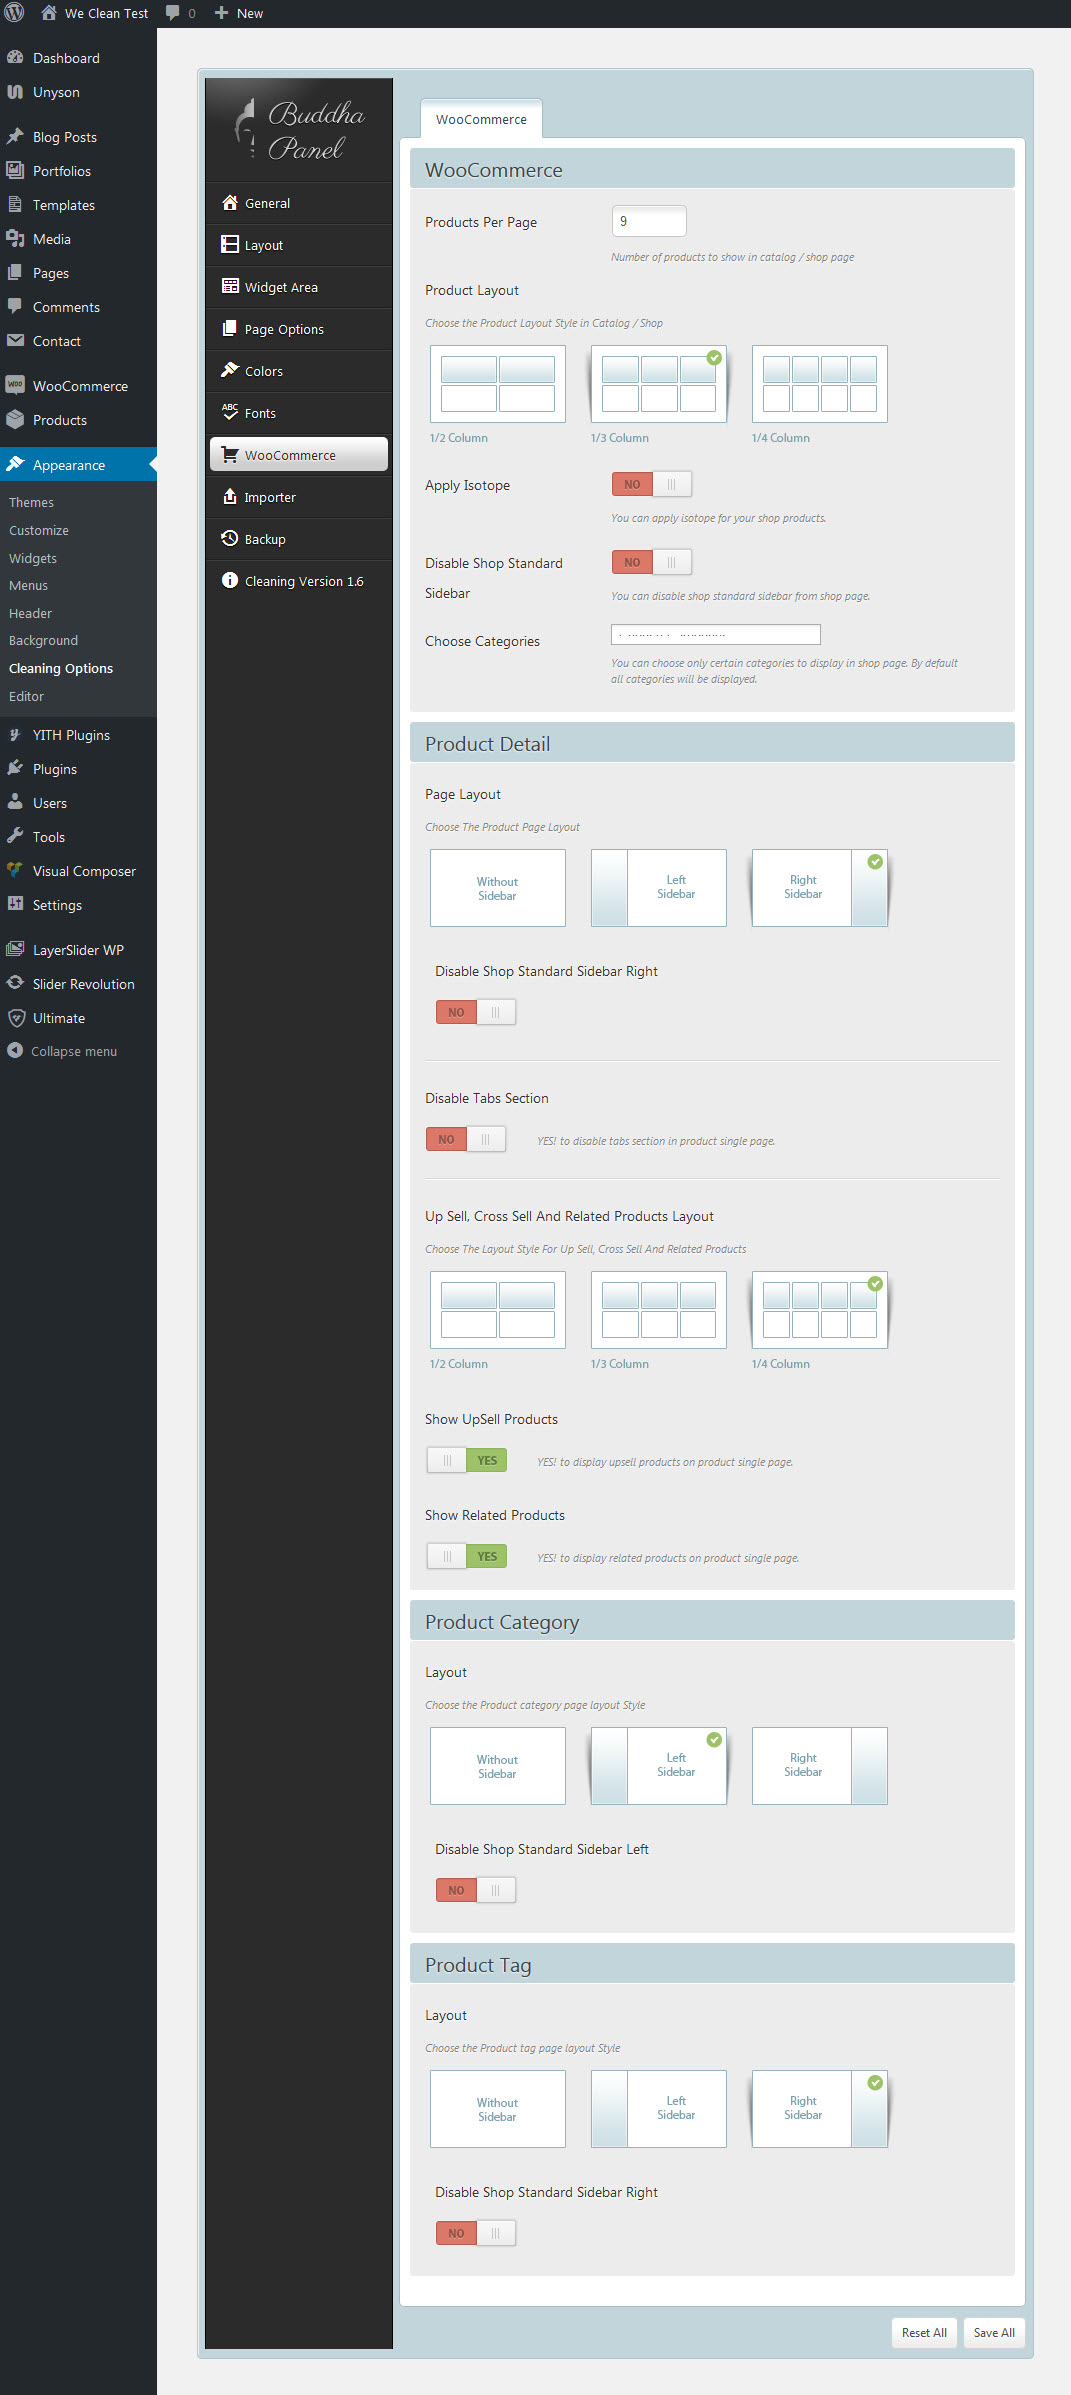
8.7 WooCommerce Options
You can choose number of products to display, product layout, apply isotope and choose only certain categories to display. You can choose page layout, upsell and crosssell product layout for product single page. Also you can choose page layout for product category and product tag.
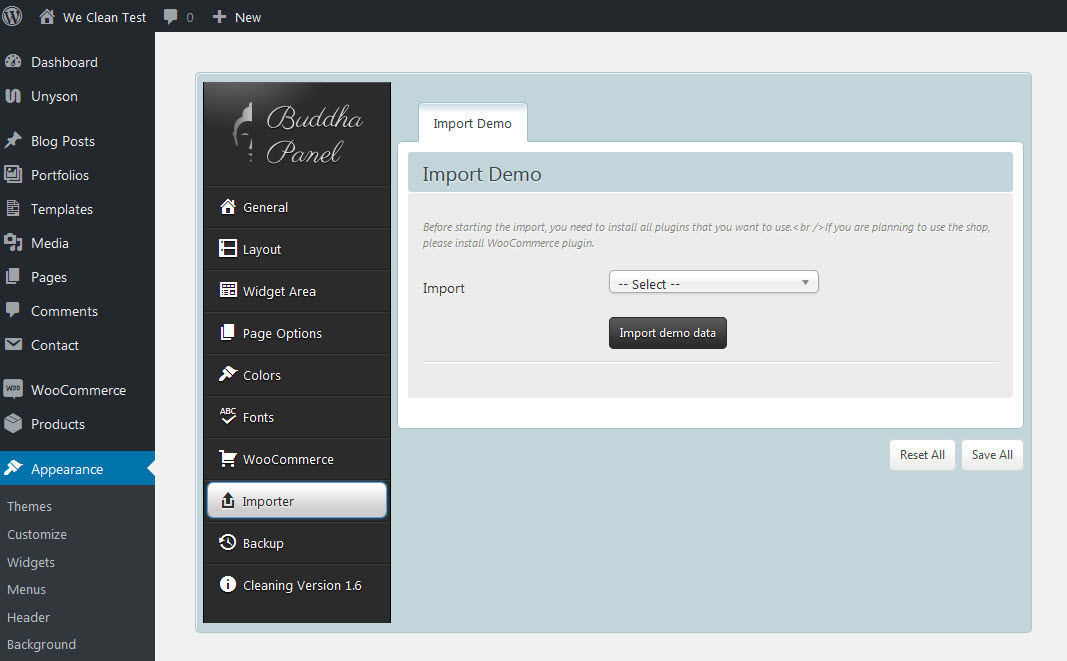
8.8 Importer Options
You can import dummy data here. Importer consists of following options.
- All - You can import complete set of datas as shown in demo site. Also it has option to import attachments.
- Content - You can import any of these contents Pages, Posts, Portfolios and Contact Forms completely.
- Menu - To import menus here.
- Options - To import buddha panel options.
- Widgets - To import the widget settings.
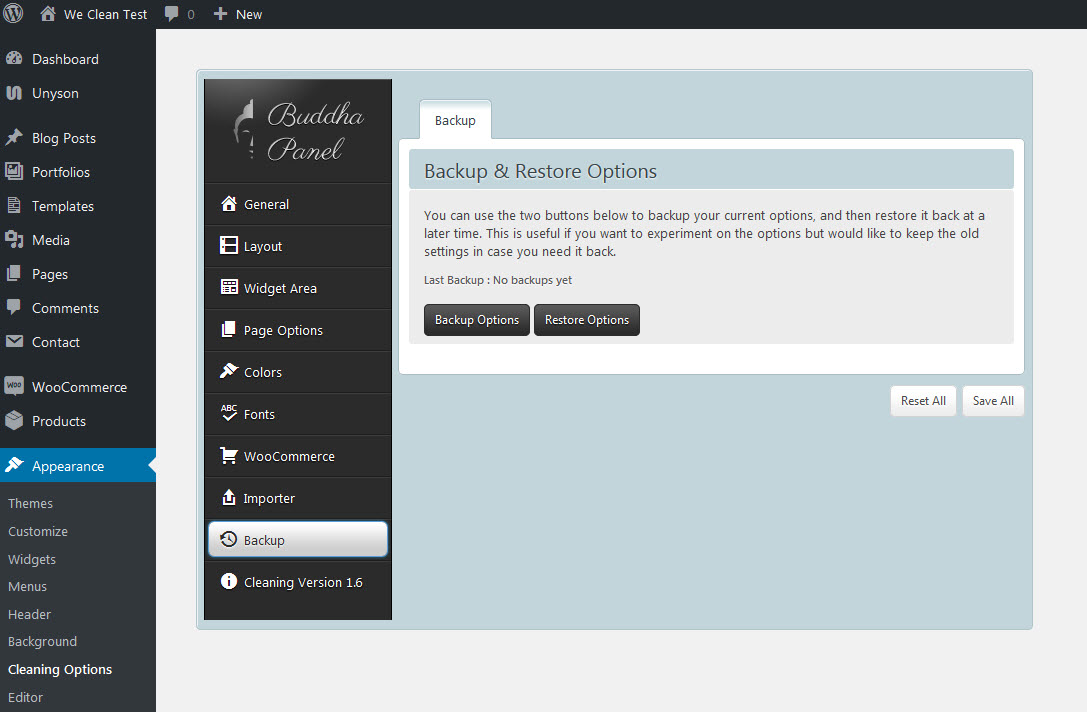
8.9 Backup & Restore Options
You can use the two buttons below to backup your current options, and then restore it back at a later time. This is useful if you want to experiment on the options but would like to keep the old settings in case you need it back.
9.Page Builder
We Clean theme come with page builder which makes creation of page simpler and easier. To enable / disable page builder in post, page, portfolio and We Clean Theme globally navigate to We Clean Theme(Buddh Panel) -> Page Builder tab. You can switch between Page Builder and WordPress default editor in any single post or page or portfolio or We Clean Theme at any time.
Overview
- 'WordPress Editor' button and 'We Clean Theme Page Builder' button is used to switch between WordPress default editor and Page Builder.
- If you keep the 'Enable page builder' option active while saving, then everytime this page will be loaded by keeping page builder active.
- Use 'Clear All' button to completely clean the builder area
- 'Create Sample Layout' button is used to save the existing modules in builder area to separate layout. After updating the page created layout will be listed in 'Sample Layouts' tab.
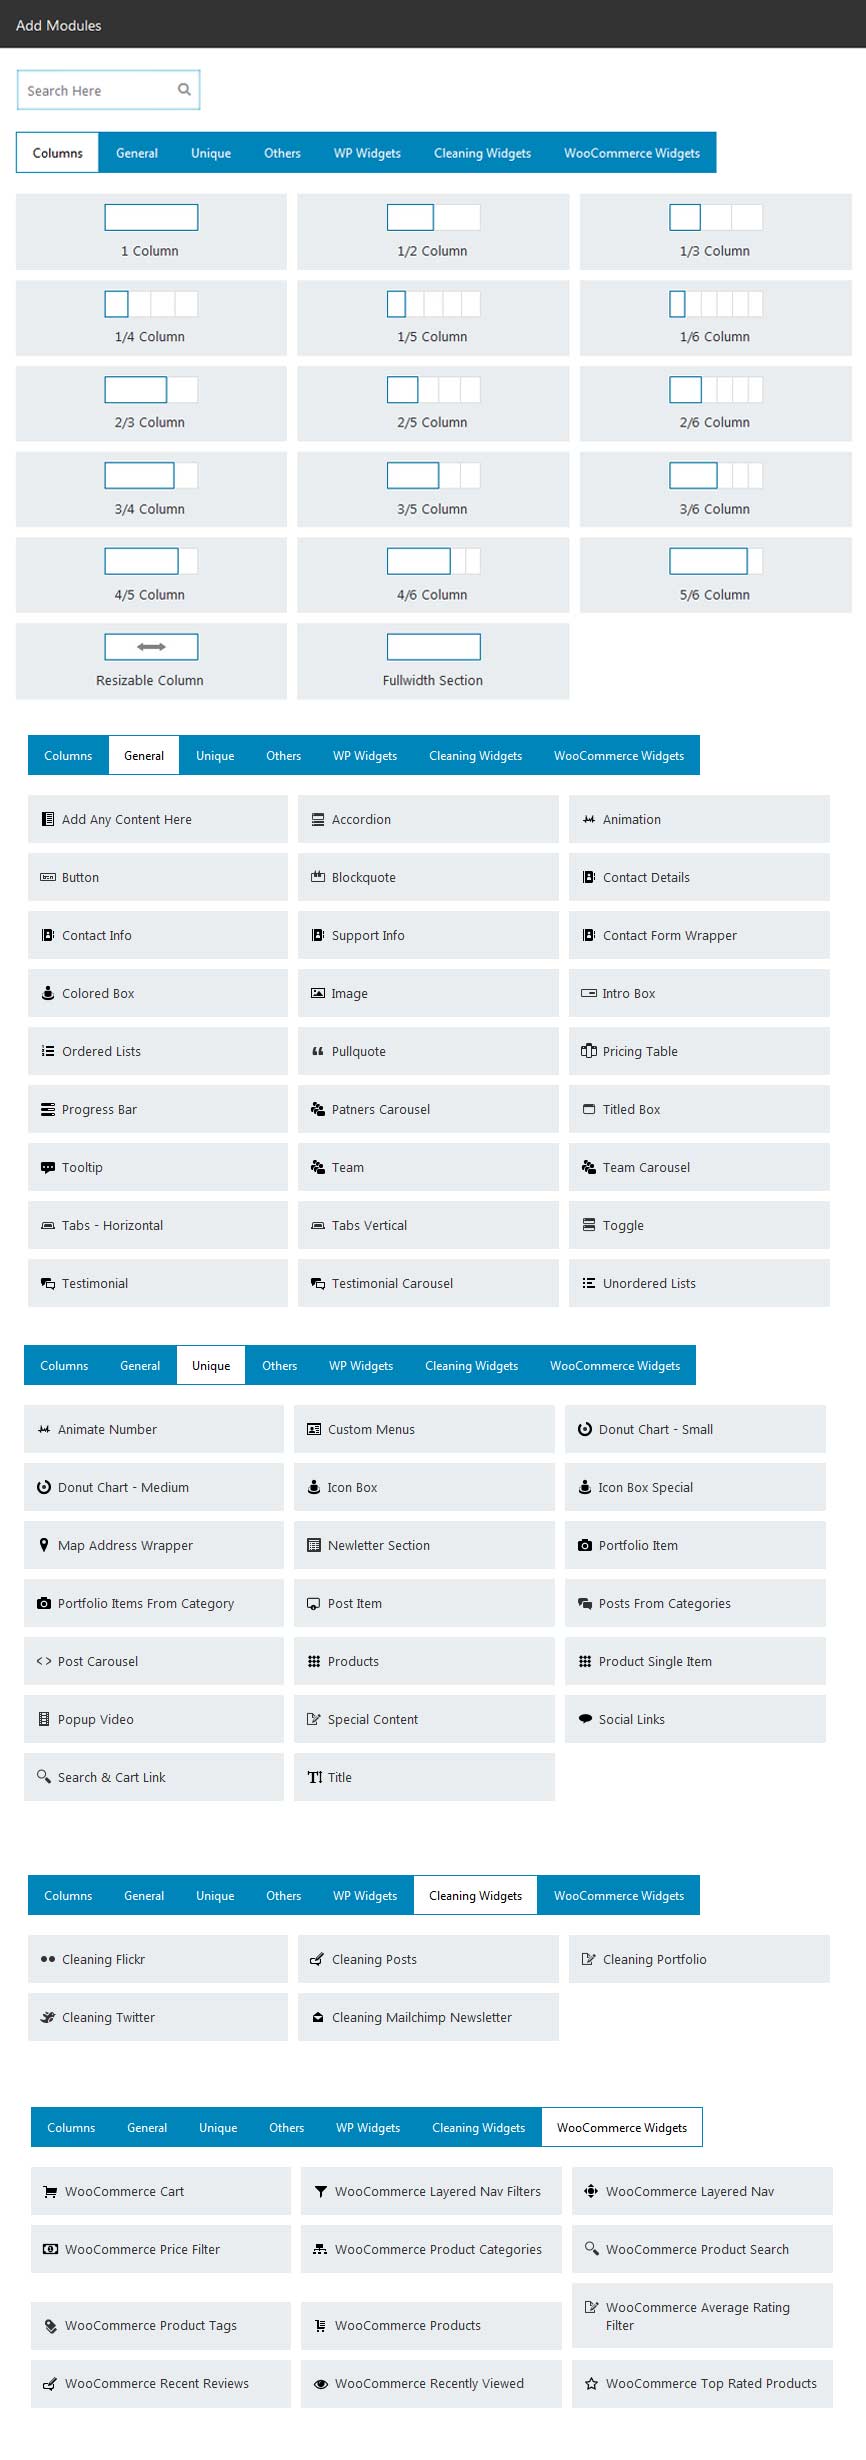
- We have 9 tabs of modules consisting of columns('Columns'), modules('General', 'Unique', 'Others'), widgets('WP Widgets', 'We Clean Theme Widgets', 'Events Widgets', 'WooCommerce Widgets') and sample layouts('Sample Layouts').
Options
Column Options
Every column comes with 3 types of options. They are,
- Settings - It is used add additional CSS class for this column alone.
- Clone - Click this button to clone the column along with every modules added inside. Those cloned column will be added immediately after current column.
- Delete - Used to delete the column completely along with its settings.
Fullwidth Section or Fullwidth Section Video
These sections comes with lot of options in 'Settings' button to configure fullwidth section. Some of the available options are,
- Fullwidth Section - Bacground Color, Background Image, Parallax Effect, Background Repeat, Background Position, Padding Top, Padding Bottom, CSS Class, etc,.
- Fullwidth Section Video - MP4, WEBM, OGV, Poster Image, Background Image, Padding Top, Padding Bottom and CSS Class.
Module Options
Every module comes with 5 different types of options. They are,
- Edit - Clicking this button will open a sliding panel at very top of the builder area which contains options to configure those modules.
- Clone - Click this button to clone the module along with its settings. Those cloned modules will be added immediately after current module.
- Delete - Use this delete button to delete the module along with its settings.
- Show / Hide - Use this button to enable or disable this module. If its disabled then that module will not be shown in frontend but all the settings of that module will be preserved, you can enable that module any time.
- Resize - Its just a symbol to represent that this module can be resized to any width. Making width too smaller or too larger may collapse the modules design.
Note : By default every module can be resized, but it cannot be resized inside another column or fullwidth section. While resizing note that making width too smaller or too larger may collapse the modules design.
Resizable Column
Resizable Column has all options similar to normal Column options. This resizable column cannot be placed inside the Fullwidth Section
Sample Layouts
We Clean theme comes with few sample layouts which can be acessed simply clicking the module. Now your builder area will be loaded with all the modules of that sample layout, now you can just update the content, images, etc, as you wish.
9.2 Visual Composer
Visual Composer is designed by the guys at WP Bakery. It's a paid plugin that is not openly available on the WordPress plugin directory. You can only download it from CodeCanyon.
In We Clean Theme, we added Visual Composer for those who prefer working with this plugin. To activate the VC plugin following theme installation, go to Appearance > Install Plugins section, install it, and activate it. The plugin will then be ready to use.
Plugin installation following theme activation is available in the same section where the default WordPress editor is visible. In the create/edit page above the WordPress editor you will see two large, blue buttons called Backend Editor and Frontend Editor. These are exactly what you need to build content within Visual Composer.
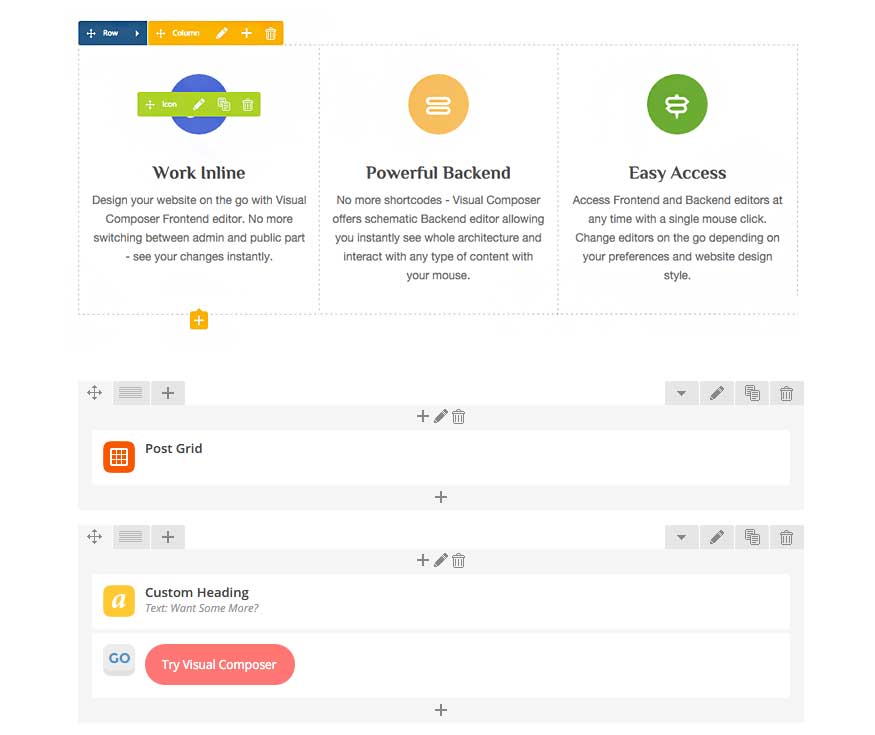
Frontend and Backend Page Building
The most powerful feature of the Visual Composer is that it gives you an easy drag and drop page builder that can be used from the standard WordPress page/post edit area or directly from the frontend.
Build your content on the go with WordPress frontend editing page builder plugin. No more admin panel needed to create stunning and beautiful pages. Visual Composer introduces new game changer in the world of WordPress plugins. Experience the true "What You See Is What You Get" and forget about "blind designing".
- Add and drag elements around the screen to quickly build unique layouts inside your WordPress theme.
- Visual Composer determines type of elements you add and highlight them with different colors in order to improve user experience and navigation.
- Switch between Guide modes to enable or disable VC menu elements and row/column borders.
- Create responsive pages with brand new responsive design controls.
Visual Composer frontend page builder allows you quickly switch between different devices to check how your content looks on tablet or mobile devices. Ensure that everything is according to design grid and your high expectations.
In addition to game changing frontend page builder, award winning backend editor is available. Quickly build any type of page with simple and intuitive drag and drop interface right from your WordPress dashboard. Backend editor of Visual Composer has been proven to be one of the most beloved WordPress plugins of all times and it is a no brainier for thousands of WordPress power users. Tons of features and regular updates always keep Visual Composer on top of competition and this allows users to update and manage content fast and easy.

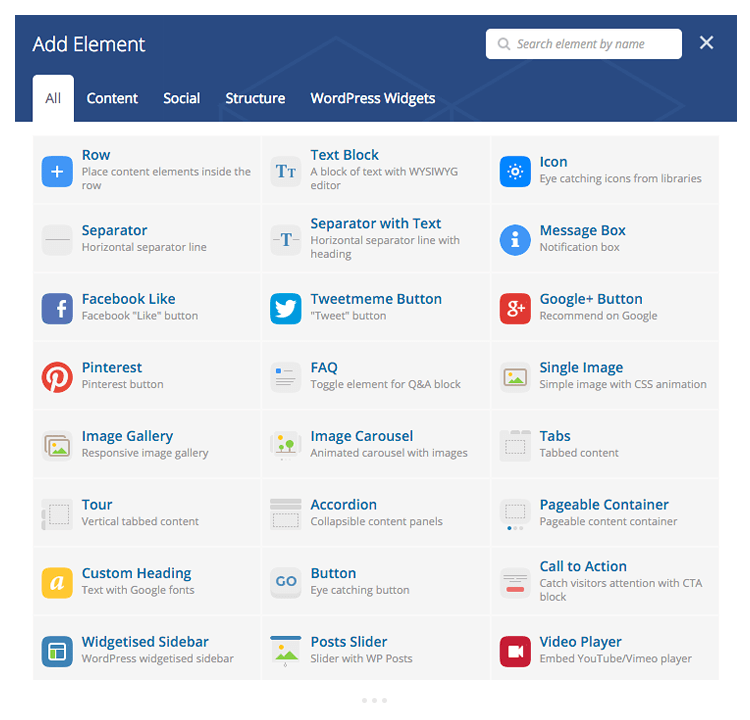
Content Elements
Visual Composer offers all the controls you need to work with content elements – add, edit, duplicate, remove or create presets for your elements whenever you wish with just single click. And with the smart Role Manager that is included in our page builder you can control access and options available to different user roles within your WordPress site. Control your WordPress site layout like never before.
Visual Composer templates
And that's not all – if you don't want to build your WordPress website from scratch you can always use our predefined templates. There are 60+ pro looking templates covering all the website sections you may need. Use predefined templates or create your own templates to reuse content and save even more time.
Built in content elements
| Text block | Pie Chart | Separator | Text separator |
| Message box | Facebook like | Google+ | |
| Tweetmeme | FAQ | Single image | Image gallery |
| Tabs | Tour section | Accordion | Icon |
| Posts slider | Widgetised sidebar | Button | Call to action |
| Video player | Google Maps | Raw JS | Raw HTML |
| Flickr widget | Progress Bar | Row | Empty Space |
| Custom Heading | Post Grid | Masonry Post Grid | Media Grid |
Frontend Page Builder and Backend Editor for WordPress
Build responsive site and manage your content easily with intuitive frontend WordPress builder. No programming knowledge required – create stunning and beautiful pages with award winning drag and drop editor. Experience the true "What You See Is What You Get" and forget about "blind designing".
- Add and drag elements around the screen to quickly build unique layouts inside your WordPress theme.
- Visual Composer determines type of elements you add and highlight them with different colors in order to improve user experience and navigation.
- Create responsive pages with brand new responsive design controls.
Visual Composer frontend editor allows you quickly switch between different devices to check how your content looks on tablet or mobile devices. Ensure that everything is according to design grid and your high expectations.
In addition to game changing frontend editor, award winning backend editor is available. Quickly build any type of page with simple and intuitive drag and drop interface right from your WordPress dashboard. Backend editor of Visual Composer has been proven to be one of the most beloved WordPress plugins of all times and it is a no brainier for thousands of WordPress power users.
10. Blog
10.1 How To Create A Blog Post
- Login to the WordPress dashboard by visiting www.yourdomain.com/wp-admin
- Click on Add New from the Posts menu once you are inside the WordPress admin panel
- Give the post a nice title.
- Add the post content in the content section using either Page Builder or WordPress Editor.
- Add relevant tags for this post.
- Add the post to the relevant category (Create a category if a relevant category doesn't exist, in Dashboard -> Posts -> Categories).
- Also you have option to choose Template page for this post.
- You can also switch between following page layouts Without Sidebar, Left Sidebar, Right Sidebar.
- If you wish you can disable feature image for this post.
- Finally publish the post by hitting Publish button.
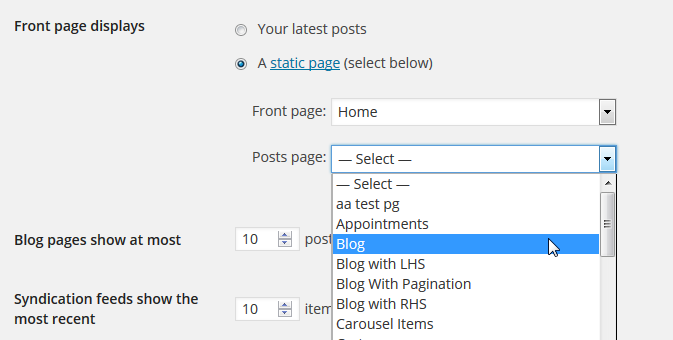
10.2 How to Assign a Post Page
Step 1 – Navigate to Dashboard -> Settings -> Reading -> Front page displays tab.
Step 2 – Select A static page option.
Step 3 – Choose the page you want as your blog post page from the Posts page dropdown list.
Step 4 – Finally make sure you click the Save Changes button.
11. Portfolio
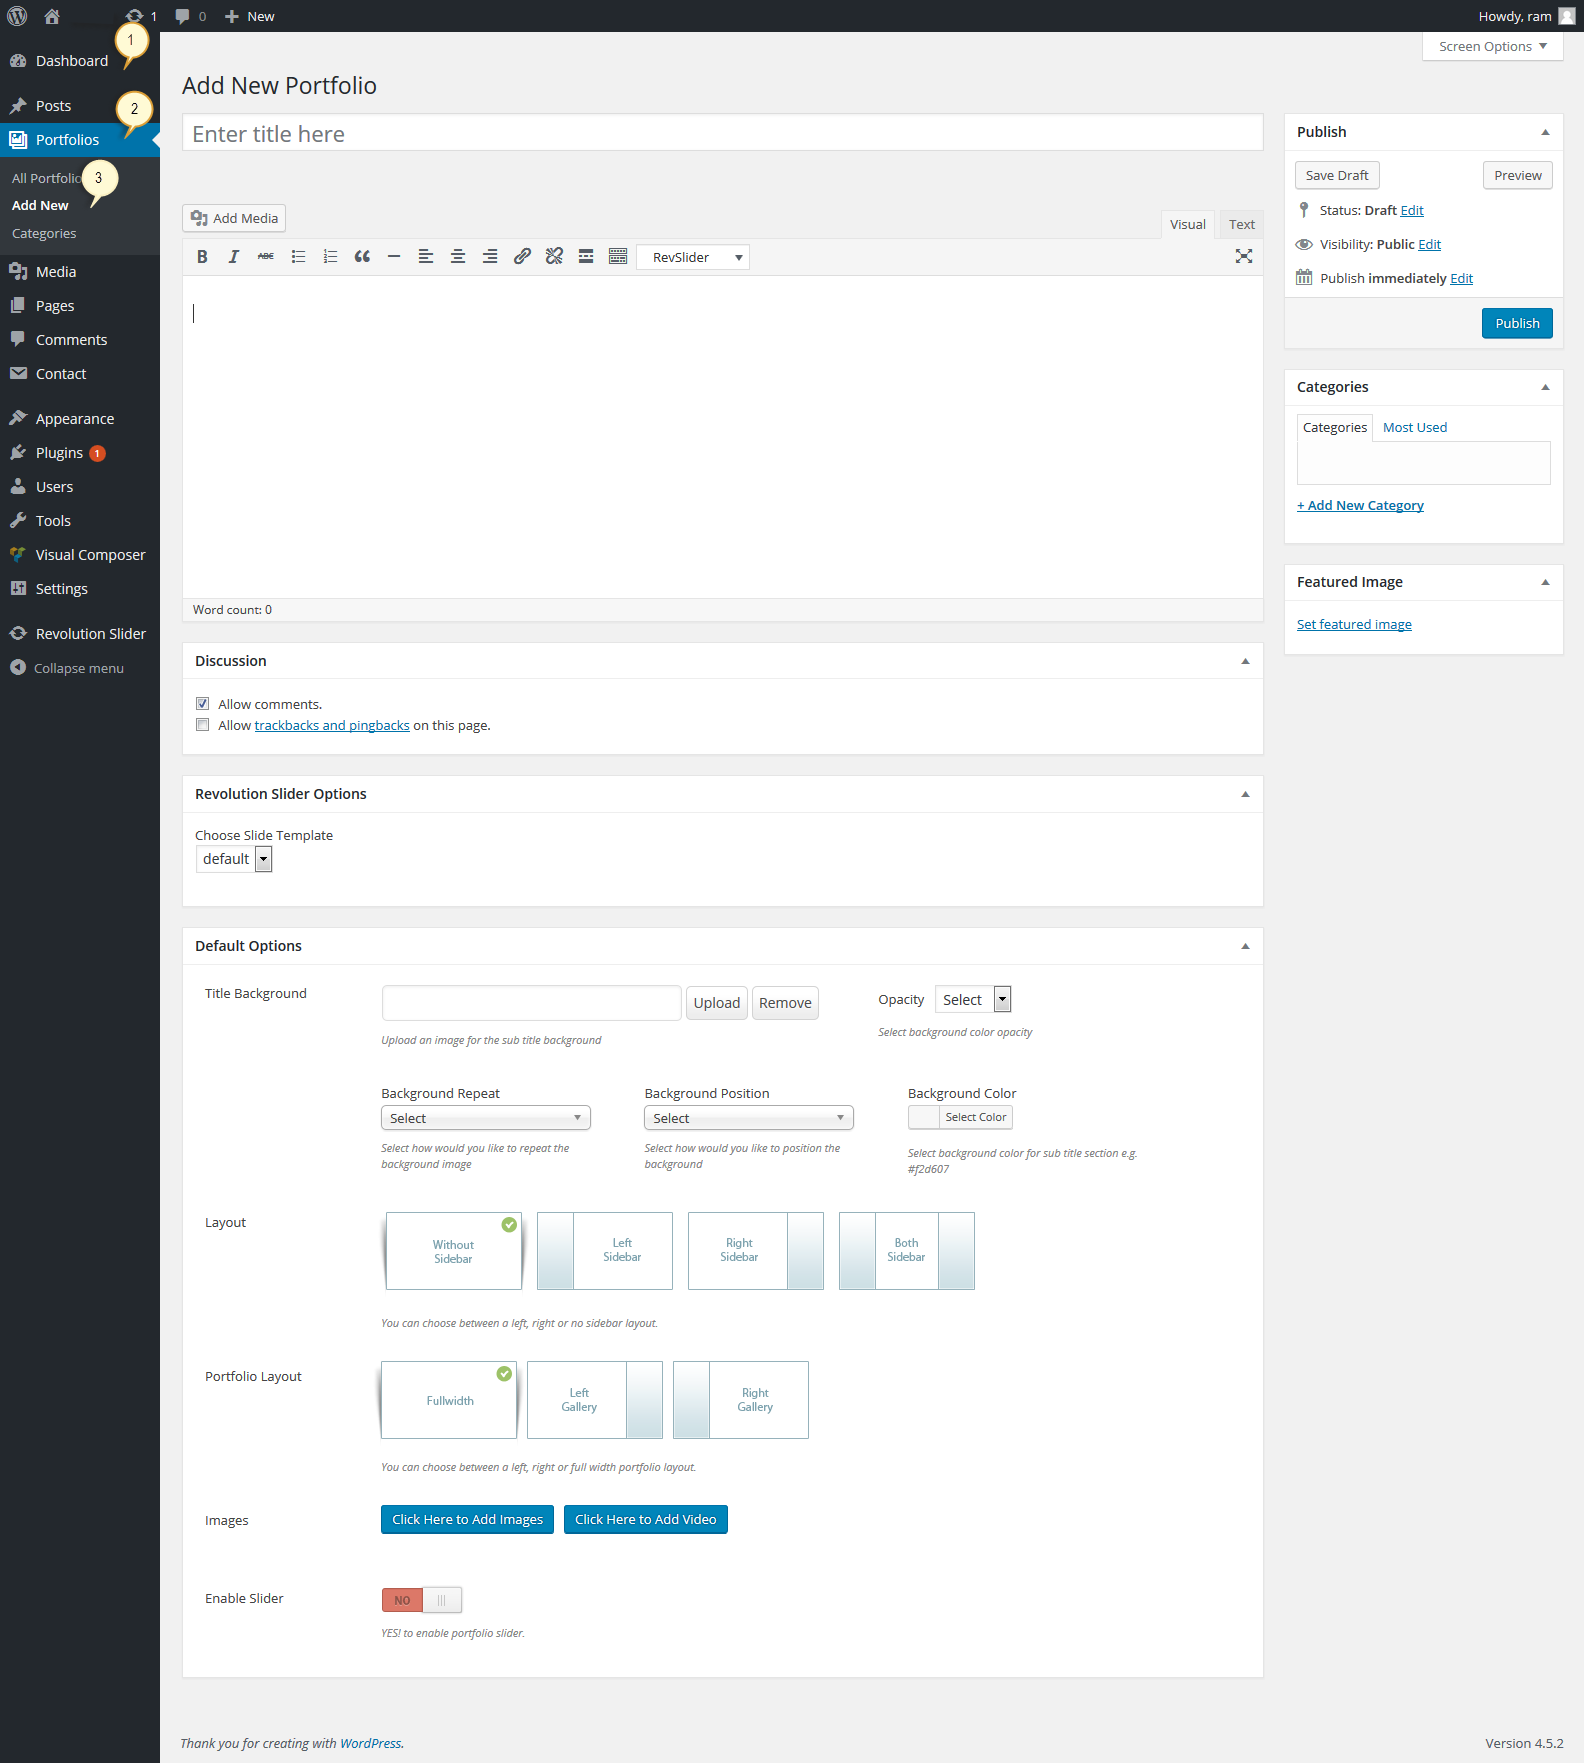
11.1 How To Create A Portfolio Item ?
- Login to the WordPress dashboard by visiting www.yourdomain.com/wp-admin.
- Click on Add New from the Portfolios menu once you are inside the WordPress admin panel.
- You can also choose Template pages for your portfolio item.
- Also you can add Sub Title for the portfolio and also you can control >Social Share for this portfolio.
- You can add any number of images for portfolio gallery.
- Publish the portfolio by hitting the Publish button.
12. WooCommerce
12.1 WooCommerce / Shop integration
We Clean Theme is fully compatible with WooCommerce plugin. We carefully created whole design so you can get very nice shop with tons of options and all looks perfect with theme design. WooCommerce is external plugin and all info about this awesome plugin you can find from plugin's author page. Below you have all friendly links that will be useful in setting up shop pages.
12.2 How to Install WooCommerce and Setup the Default Shop Pages ?
Step 1 : Go to your Plugins menu of your WordPress admin and click on the Add New button at the top of the page.
Step 2 : Enter WooCommerce in the search field and choose the first one called WooCommerce – excelling eCommerce and click on the Install Now button.
Step 3 : WooCommerce will install, then click the link that says Activate Plugin.
Step 4 : You will then see a WooCommerce Purple Notficication Bar at the top of the plugin page. Click the Install WooComemrce Pages button in the purple bar to install all the default pages.
Step 5 : WooCommerce automatically creates the necessary pages. If you need to reassign the pages to different WooCommerce page designations, you can do so in the WooCommerce settings page (Dashboard -> WooCommerce -> Settings).
12.3 How To Create Your Products ?
Step 1 – Navigate to Dashboard -> Products and click on Add Product button. Enter a name for your product at the top of the page.
Step 3 – Enter the product description text into the post content field, this will be all about your product.
Step 4 – The Product Data box is where you enter all the product details (ex. price, SKU, shipping, and more).
Step 5 – The Product Short Description box which will be the short intro copy that shows next to your main images.
Step 6 – Set your main Featured Image in the right sidebar Product Image box. This has to be done for every product.
Step 7 – To use a gallery of images, insert more images in the Product Gallery box.
Step 8 – Enter your categories in the Product Categories box and enter your tags in the Product Tags box.
Step 9 – When all your data is entered, click Publish and the item will now show on your main shop page.

13. Translation & WPML
13.1 Basic Translation
You can follow these steps to make basic translations for your WordPress core.
Step 1 : Open wp-config.php file by logging into your FTP account and look for following line define('WPLANG', '');. Define your local language here, examples de_DE, nl_NL,. Then your code will look like this define('WPLANG', 'de_DE');. For more information on language codes Click Here
Step 2 : We Clean theme and Designthemes Core Features Plugin (bundled with theme) are translated separately. The theme po file will be inside wp-content / themes / We Clean / languages folder in the name of default.mo and default.po and plugin po file will be inside wp-content / plugins / designthemes-core-features / languages folder in the name of dt_plugins-default.mo and dt_plugins-default.po
Step 3 : You can use these files as base for your translation. In order to make WordPress recognize the language to which you want to translate the theme, you will have to name the the language files accordingly. For example the file name of Detusch language would be de_DE.po and de_DE.mo for theme, dt_plugins-de_DE.po and dt_plugins-de_DE.mo for plugin.
Step 4 : To translate the default.mo and default.po file in your language, follow the steps below.
- Download and install the POedit here.
- Open the default.po file in POEdit and you will find all English text strings in the left column. Once you add translations those will show up in the right column.
- Choose the line you want to translate and then check the lower part of the POEdit window where you will find a textarea to add the correct translation.
- When you are done translating all needed strings save the file with your language code, for example: de_DE.po(theme) and .dt_themes-de_DE.po(DesignThemes Core Features Plugin). Make sure files are in the respective folder for theme wp-content / themes / We Clean / languages and for plugin wp-content / plugins / designthemes-core-features / languages.
Note : You can also refer POedit site to get some additional information.
13.2 WPML
We Clean theme has the capability to be used in any language.It is also possible to create a multilingual website with help of WPML wmpl plugin. Please read the FAQ section to get an idea.
- WPML – WPML official site
- Widgets Translation – Check this link for translating WordPress widgets.
- FAQ – Checkout this page to get basic idea of WPML
- WPML Forum Support - You will get free support from WPML tean once you have purchsed thier plugin.
You can download and install WPML manually, by downloading ZIP files from your WPML.org account, or automatically, via the Plugins admin screen. In case you want to install WPML manually, follow these steps: Log in to your WPML.org account. Go to the Downloads section. Download the WPML components that you need. Than move those files to following location wp-content / plugins of your server.
13.3 How To Use RTL
Step 1 – Install an RTL version of WordPress, such as the Arabic or Hebrew version.
Step 2 – Have the proper Language files installed in the languages directory, which you can locate by following this path: wp-content / themes / We Clean / languages
Step 3 – Specify the language you'd like to use in the wp-config.php file.

15. More Options
15.1 Child themes
Why use a Child theme?
Safe Updates. You can easily modify your website using child themes without ever changing the parent theme. When a new version of the parent theme appears, you can safely update it as all your modifications are saved in the child theme.
Easy to Extend. A child theme has a great flexibility. It does not require writing a lot of code. You can modify only those template files and functions that you need.
Note : When you install one of our themes you must upload both parent and child theme folders to wp-content / themes but you should only activate the Child theme via Dashboard -> Appearance -> Themes.
Modifying files from the Parent theme folder
While you should never edit files in your Parent theme, if you really must, the safest way to do it is to download a copy of the file you want to modify on your computer, make the changes, and then upload it into your child theme folder.
Note : This way of modifying the files can be used for any files from the parent theme — note that you must re-create the same folder structure in your child theme that exist in the parent theme in order for the modifications to take effect.
15.2 Demo Content Fails: Seems Like An Error Has Occurred
If you attempted to import the We Clean theme sample demo data, but it never completes the installation process or it fails with errors, there could be several reasons. Please read the following information.
Likely Causes For Demo Import Failing
- Your PHP memory, file upload size, and/or execution limits are set too low
- Your web host uses process watching software that prevents bulk processing on their web servers.
- You have define('WP_DEBUG', true), please change that to define('WP_DEBUG', true) for the import in your wp-config.php file
- The import uses a JSON file which is loaded from the frontend of the website, this will not work when the domain is not connected to the WordPress installation.
Recommended PHP Configuration Limits
If the import stalls and fails to respond after a few minutes, or it fails with a simple error message like "Import failed," You are suffering from PHP configuration limits that are set too low to complete the process. You should contact your web host and ask them to increase those limits to a minimum as follows:
- max_execution_time 180
- memory_limit 128M
- post_max_size 32M
- upload_max_filesize 32M
How To Verify Your Current PHP Limits
You can verify your PHP configuration limits by installing a simple plugin here. In addition, you can always contact your host and ask them what the current settings are and have them adjust them if needed. Please note though that many hosts will try to keep the PHP limits low without reason. However you are paying for it, and therefor should be getting your moneys worth.
15.3 Support Info
You can contact us in few ways. It depends on what you exactly need.
All of our items come with free support and we have a dedicated support forum to handle your requests. Support is limited to questions regarding the theme's features or problems with the theme. We are not able to provide support for code customizations or third-party plugins. If you need help with anything other than minor customizations on our theme, then you should enlist the help of a developer.
We expect every users to follow these steps before posting in our support forum,
- Always check the documentation completely, you might have answers for your questions in the documentation.
- Always search in forum or themeforest comments before posting, because your issue might have brought up and answered already.
- If you didn't find answer for your question anywhere then please post a new topic with brief description and with live url of your site or url in which problem you are referring to exists. Also, please provide us some screenshot, if it is more complicated. Sometimes we may also in need of WP and FTP login information to resolve your issue. All those informations will stay private with our support team.
- Please be patient! we will try to provide the solutions as quick as possible. It will take around 2 days to respond, we will reply from old to new post basis.
Regarding Customization
We have made our theme as easy to use and customization-friendly. So, you can go with most of the possible changes and customization easily. But, if you have any troubles or just want us to work for you, please feel free to contact us via the Support forum. We are ready to support and happy to help (always) at anytime. If the requested query will rely on the minor customization, we can provide the free support and will work at no cost. Or, if you want to have any additional options (features) apart from our theme default functions, we would charge our minimum cost for such customizations.
15.4 Theme Quickstart Installation
Kindly, Make sure you have followed all the steps mentioned below
Step 1 : You need to install the dummy contents from Dashboard > Appearance > We Clean Option > Importer.
Step 2 : Then update the permalinks from Dashboard > Settings > Permalinks.
Step 3 : Change the home page from Dashboard > Settings > Readings.
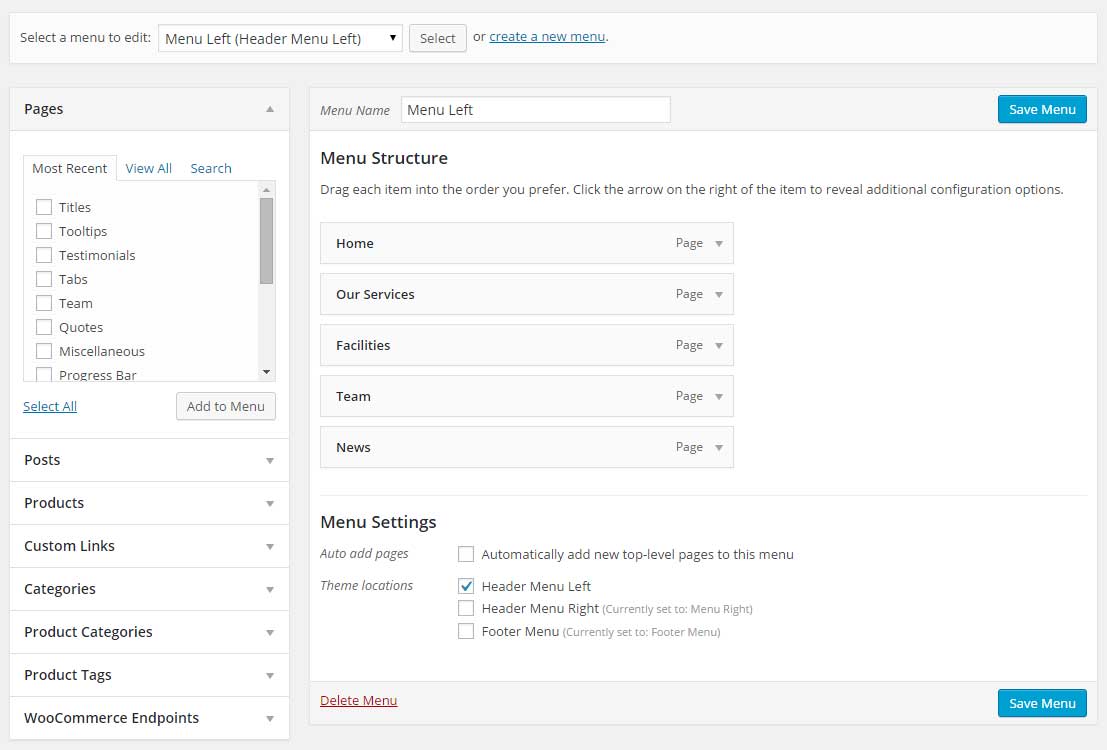
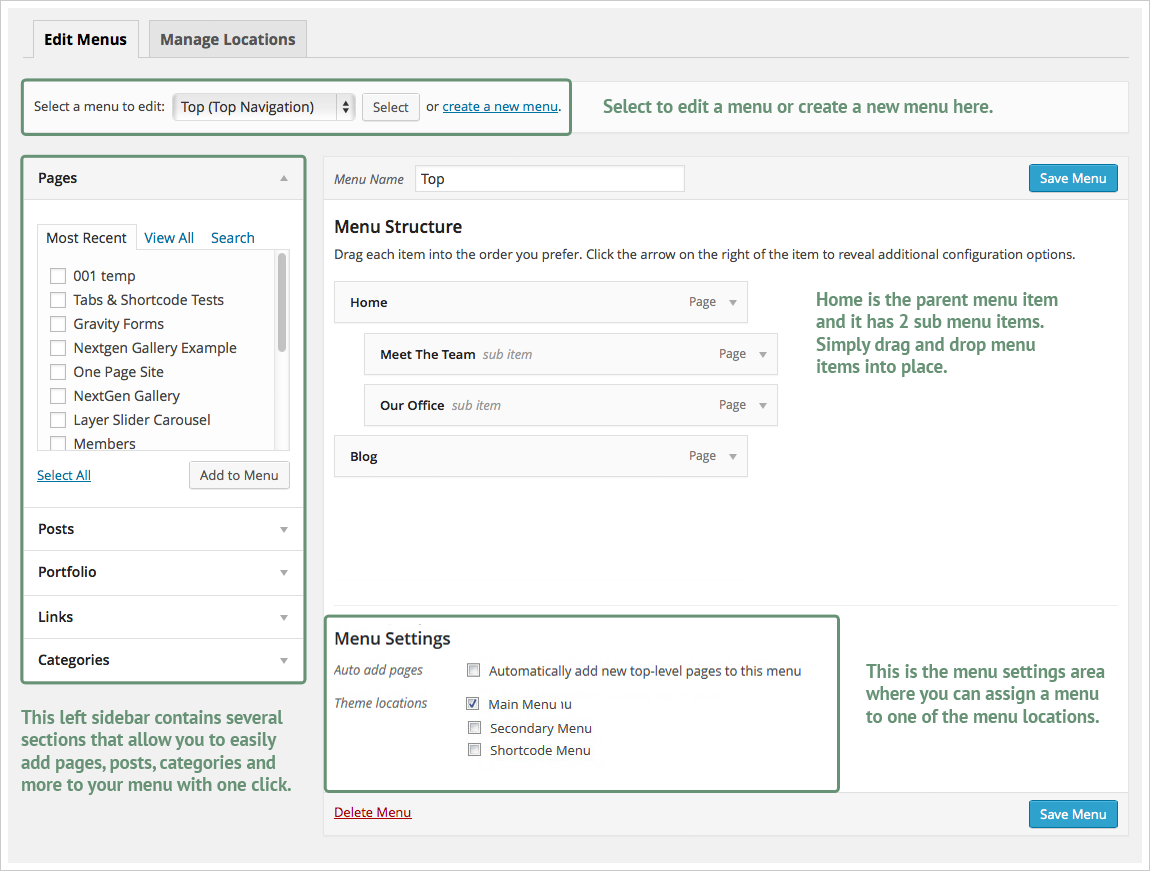
Step 4 : Update the menus locations from Dashboard > Appearance > Menus > Menu Locations.
Step 5 : Add slider to layerslider or revolution slider and add it to the home page using the slider options below the editor section.
Note : Make sure you have installed all the recommended plugins before these steps.